SigNoz で Azure App Service を観測する
#observability #azure #signoz #appservice
Observability ツールの SigNoz に Azure, AWS, GCP などパブリッククラウドの設定方法についてドキュメントが記載されいて心が高まったので作業ログです。
検証の登場人物
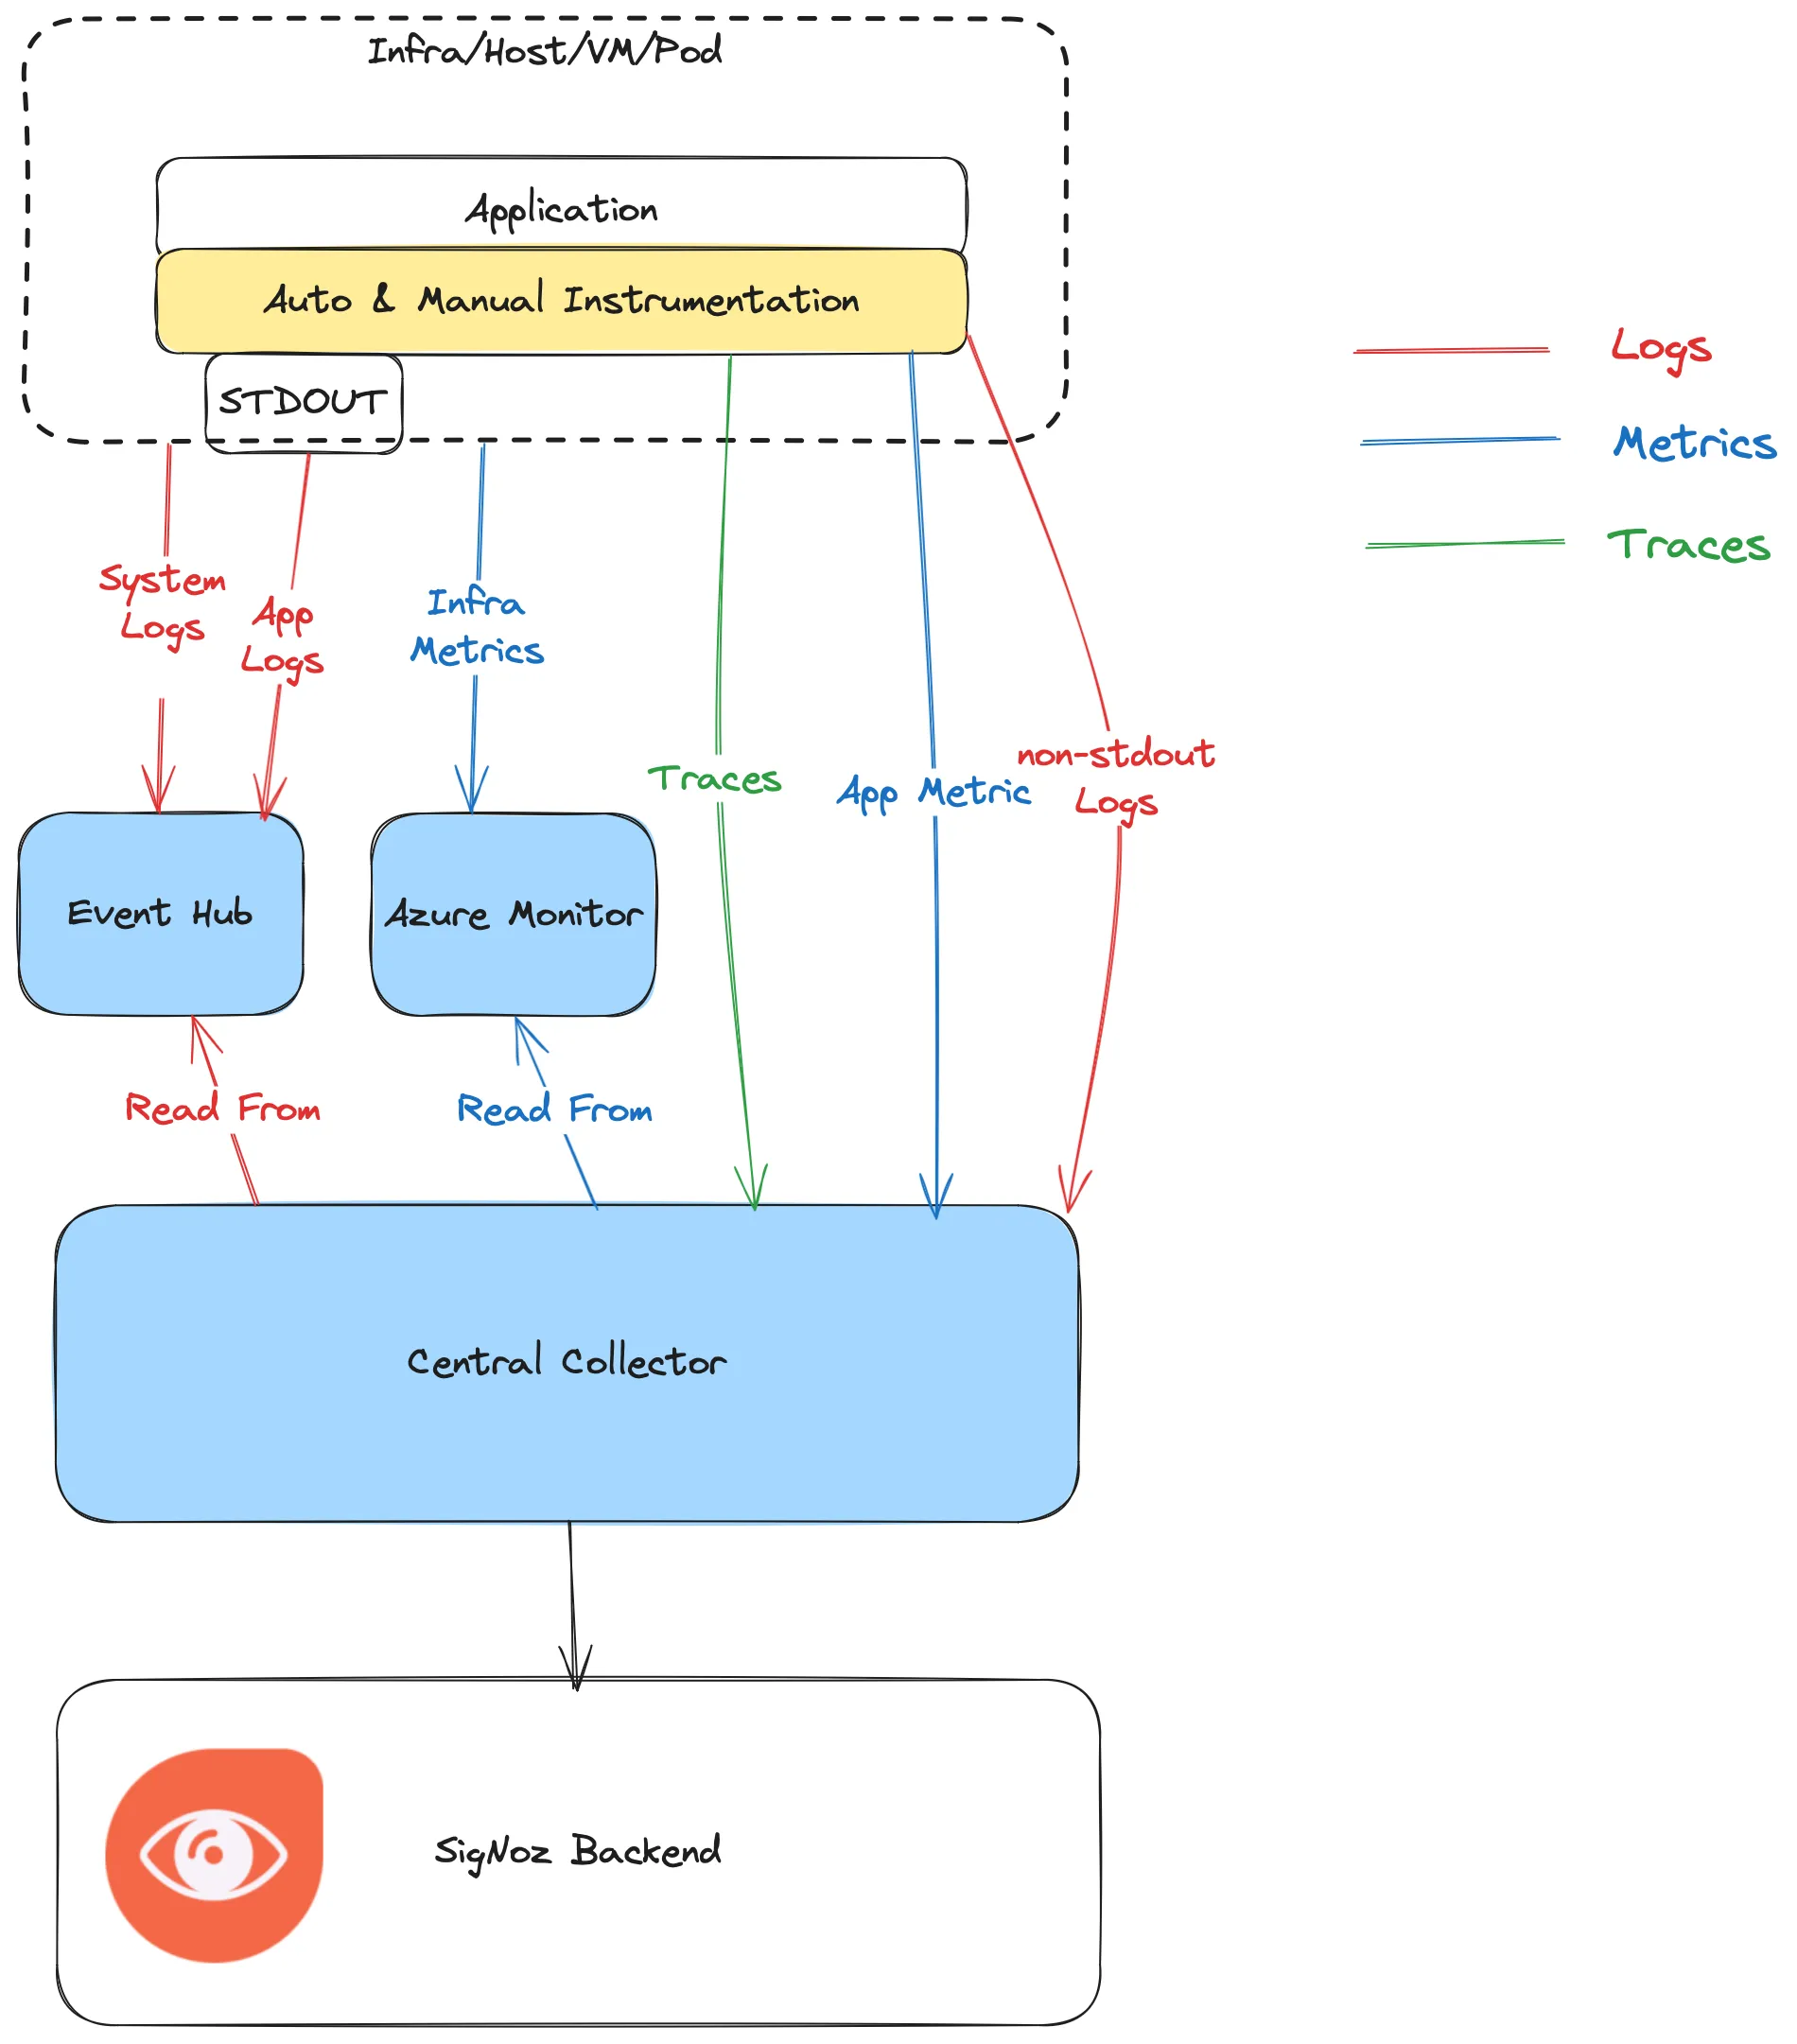
以下の SizNoz の実装ガイドを元に構築を進めます。
- Application 部分は Azure App Service (Web Apps)を利用します。
- Event Hub, Azure Monitor を利用します。
- Central Collector は Azure VM を利用します。
- SigNoz Backend は Azure VM 上に Self-Host したものを利用します。
https://signoz.io/docs/azure-monitoring/bootstrapping/strategy/#implementation-guide
環境を構築してみる
以降手順になります。
Azure の Subscription の作成は省略します。
Step1 サンプルアプリ(.NET)の作成
ASP.NET でサンプルアプリを作成します。
参考: https://opentelemetry.io/docs/languages/net/getting-started/
諸々 OpenTelemetry の実装などを加えたのがこちら です。
Step2 Azure App Service (Web Apps) を作成
Step1 で作成した ASP.NET のアプリを Azure App Service 上に展開します。
- App Service Plan の作成
- 検証用で Plan は Free としています。
- Web Apps の作成
- 今回は OS を Windows にしています。
- デプロイ出来ているか確認
$ curl -X 'GET' \
  'https://signoz-azure-xxxxx.japaneast-01.azurewebsites.net/WeatherForecast' \
  -H 'accept: text/plain'

[{"date":"2024-09-25","temperatureC":39,"temperatureF":102,"summary":"Hot"},{"date":"2024-09-26","temperatureC":-3,"temperatureF":27,"summary":"Chilly"},{"date":"2024-09-27","temperatureC":40,"temperatureF":103,"summary":"Freezing"},{"date":"2024-09-28","temperatureC":11,"temperatureF":51,"summary":"Chilly"},{"date":"2024-09-29","temperatureC":53,"temperatureF":127,"summary":"Bracing"}]%
Step3 Azure Event Hubs の作成
Event Hubs namespace の作成
今回はサンプルとして動かすだけなので最小構成で作成します。
価格レベル: Basic, スループットユニット: 1ユニットで作成しました。
なお、これらの値に関しては後から変更が可能です。
Event Hub の作成
作成した Event Hubs Namesapce のリソースの + イベントハブ から新規の Event Hub を作成します。
最小設定で作成をします。パーティション数、バックアップポリシーは後から変更できます。
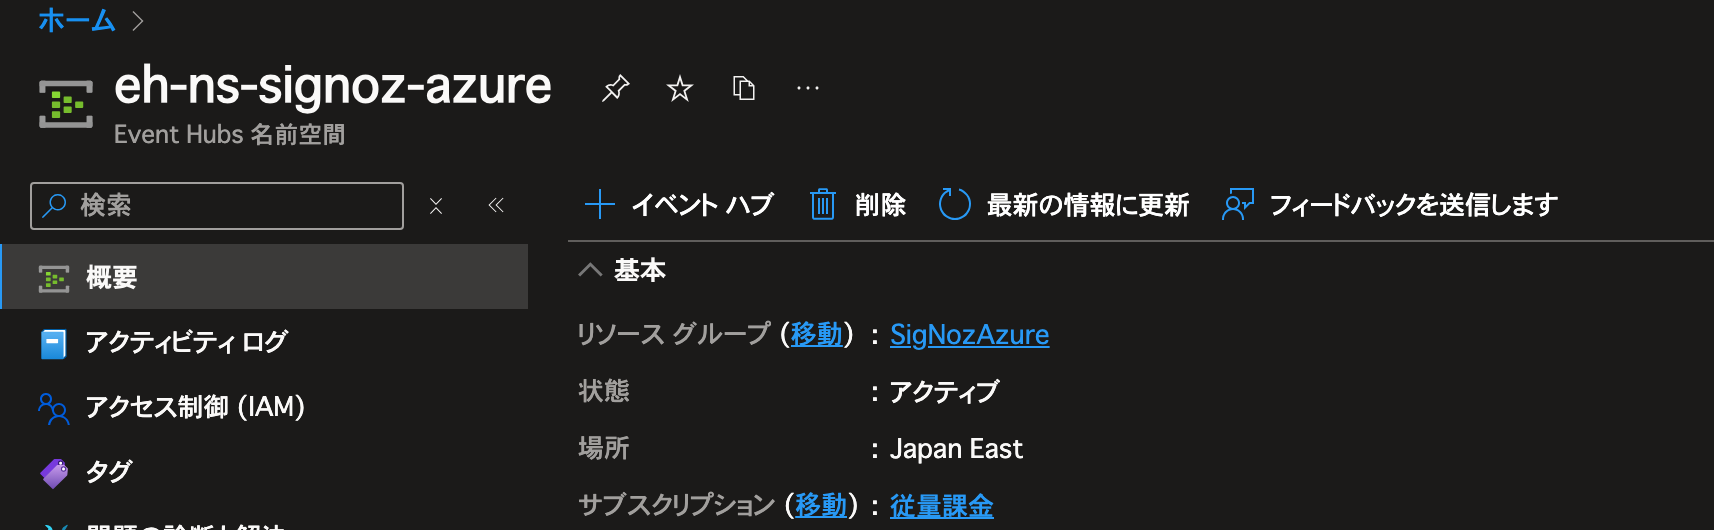
作成が完了すると概要ページから確認できます。

Event Hub 用の SAS ポリシーを作成し、接続文字列をコピーする
Event Hubs Namespace の エンティティ -> Event Hubs -> 作成した EventHubs を選択-> 設定 -> 共有アクセスポリシー -> 追加 で新規の SAS ポリシーを追加します。
Listen ポリシーのみにチェックをつけて作成します。

作成した SAS ポリシーの”接続文字列 – 主キー”(Endpoint=sb://....)の接続文字列をコピーしておきます。
これは 後述の Central Collector 作成時に利用します。
参考: https://signoz.io/docs/azure-monitoring/bootstrapping/data-ingestion/
Event Hubs への転送設定を行う
Step4 Azure Monitor の受信設定変更
インフラメトリクスを Central Collector に渡すために Azure Monitor のセットアップを行います。
参考: https://signoz.io/docs/azure-monitoring/bootstrapping/collector-setup/#azure-monitor-receiver-configuration-1
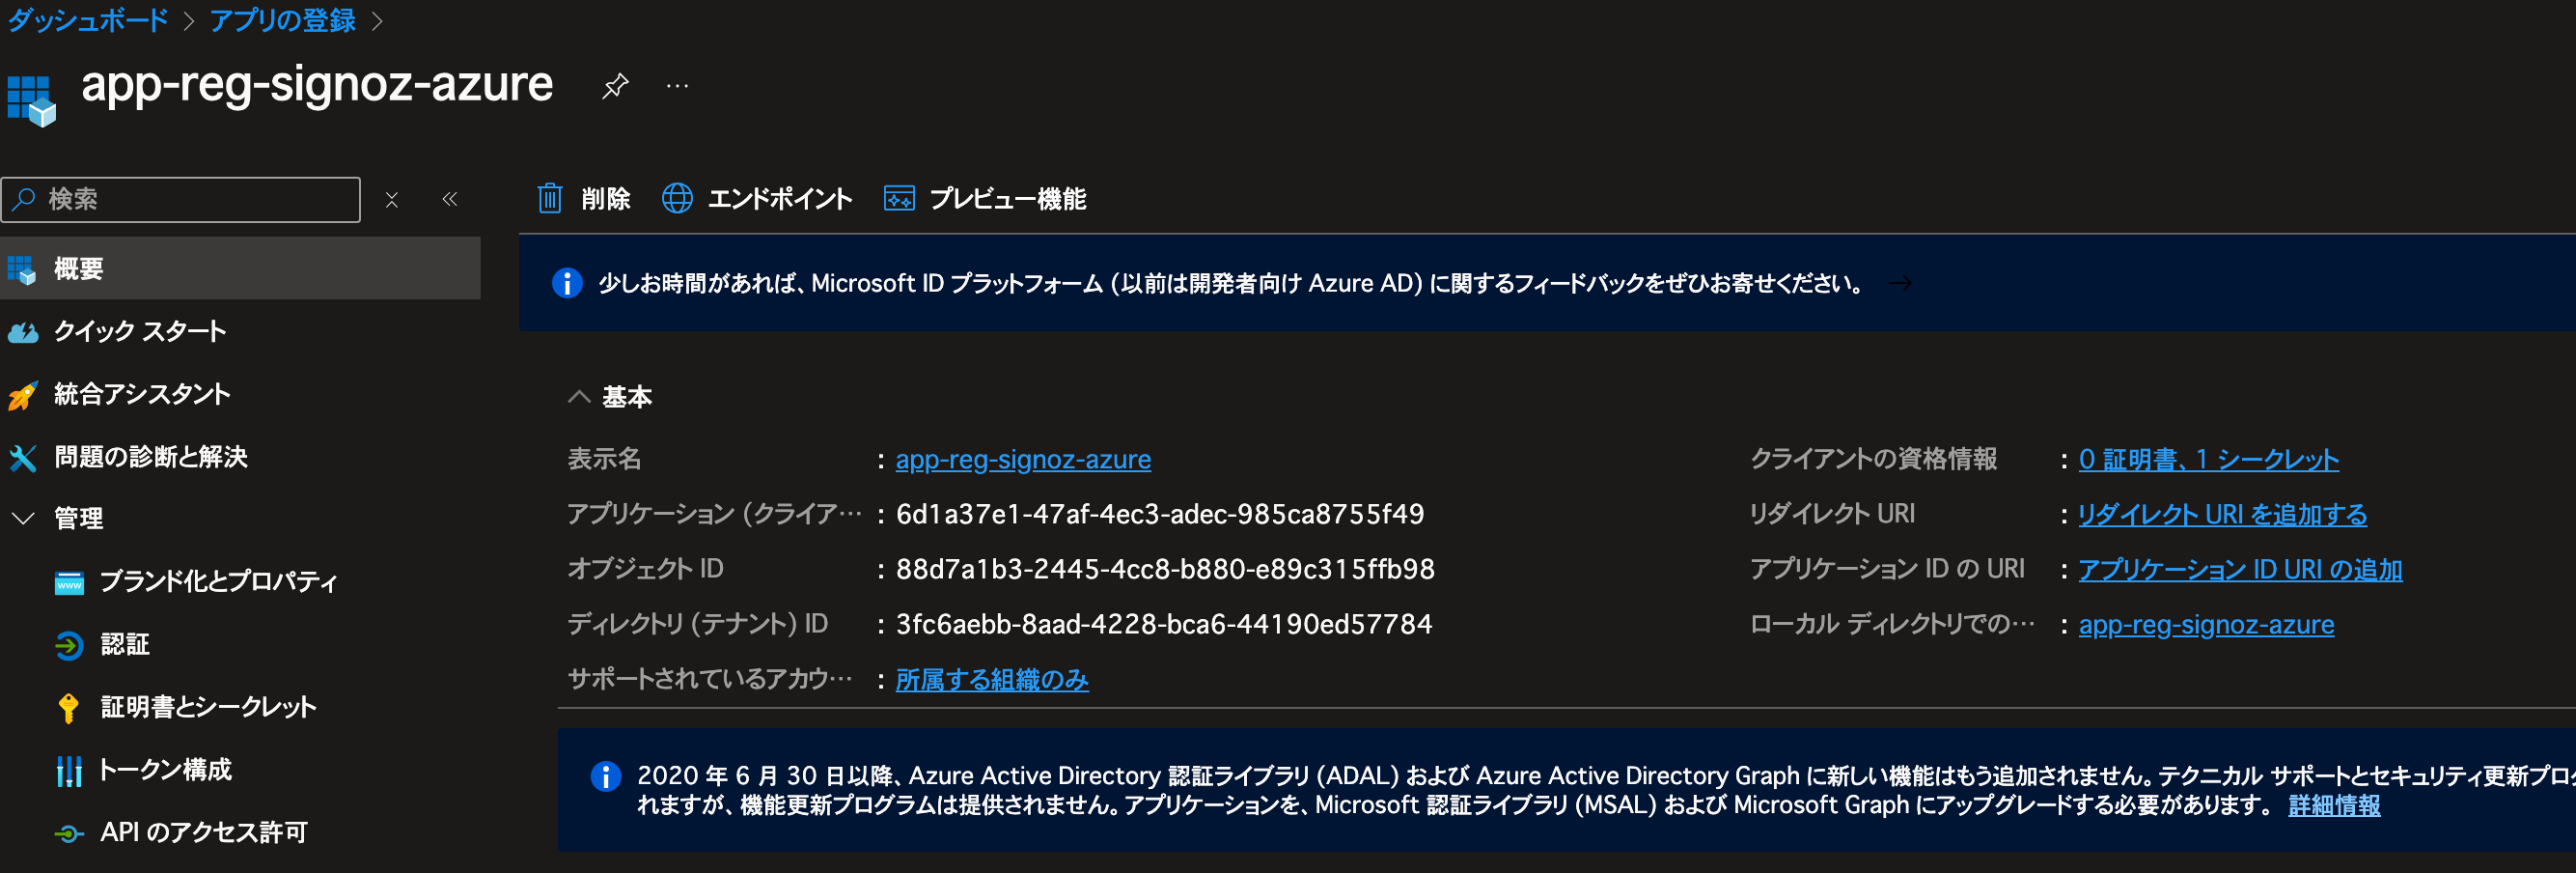
アプリの登録
アプリの登録からアプリケーションの登録をします。
作成時に要求されるリダイレクト URI は空でも構いません。
後ほどアプリの概要にある アプリケーション(クライアントID) , ディレクトリ (テナント) ID は利用するので控えておくと良いです。
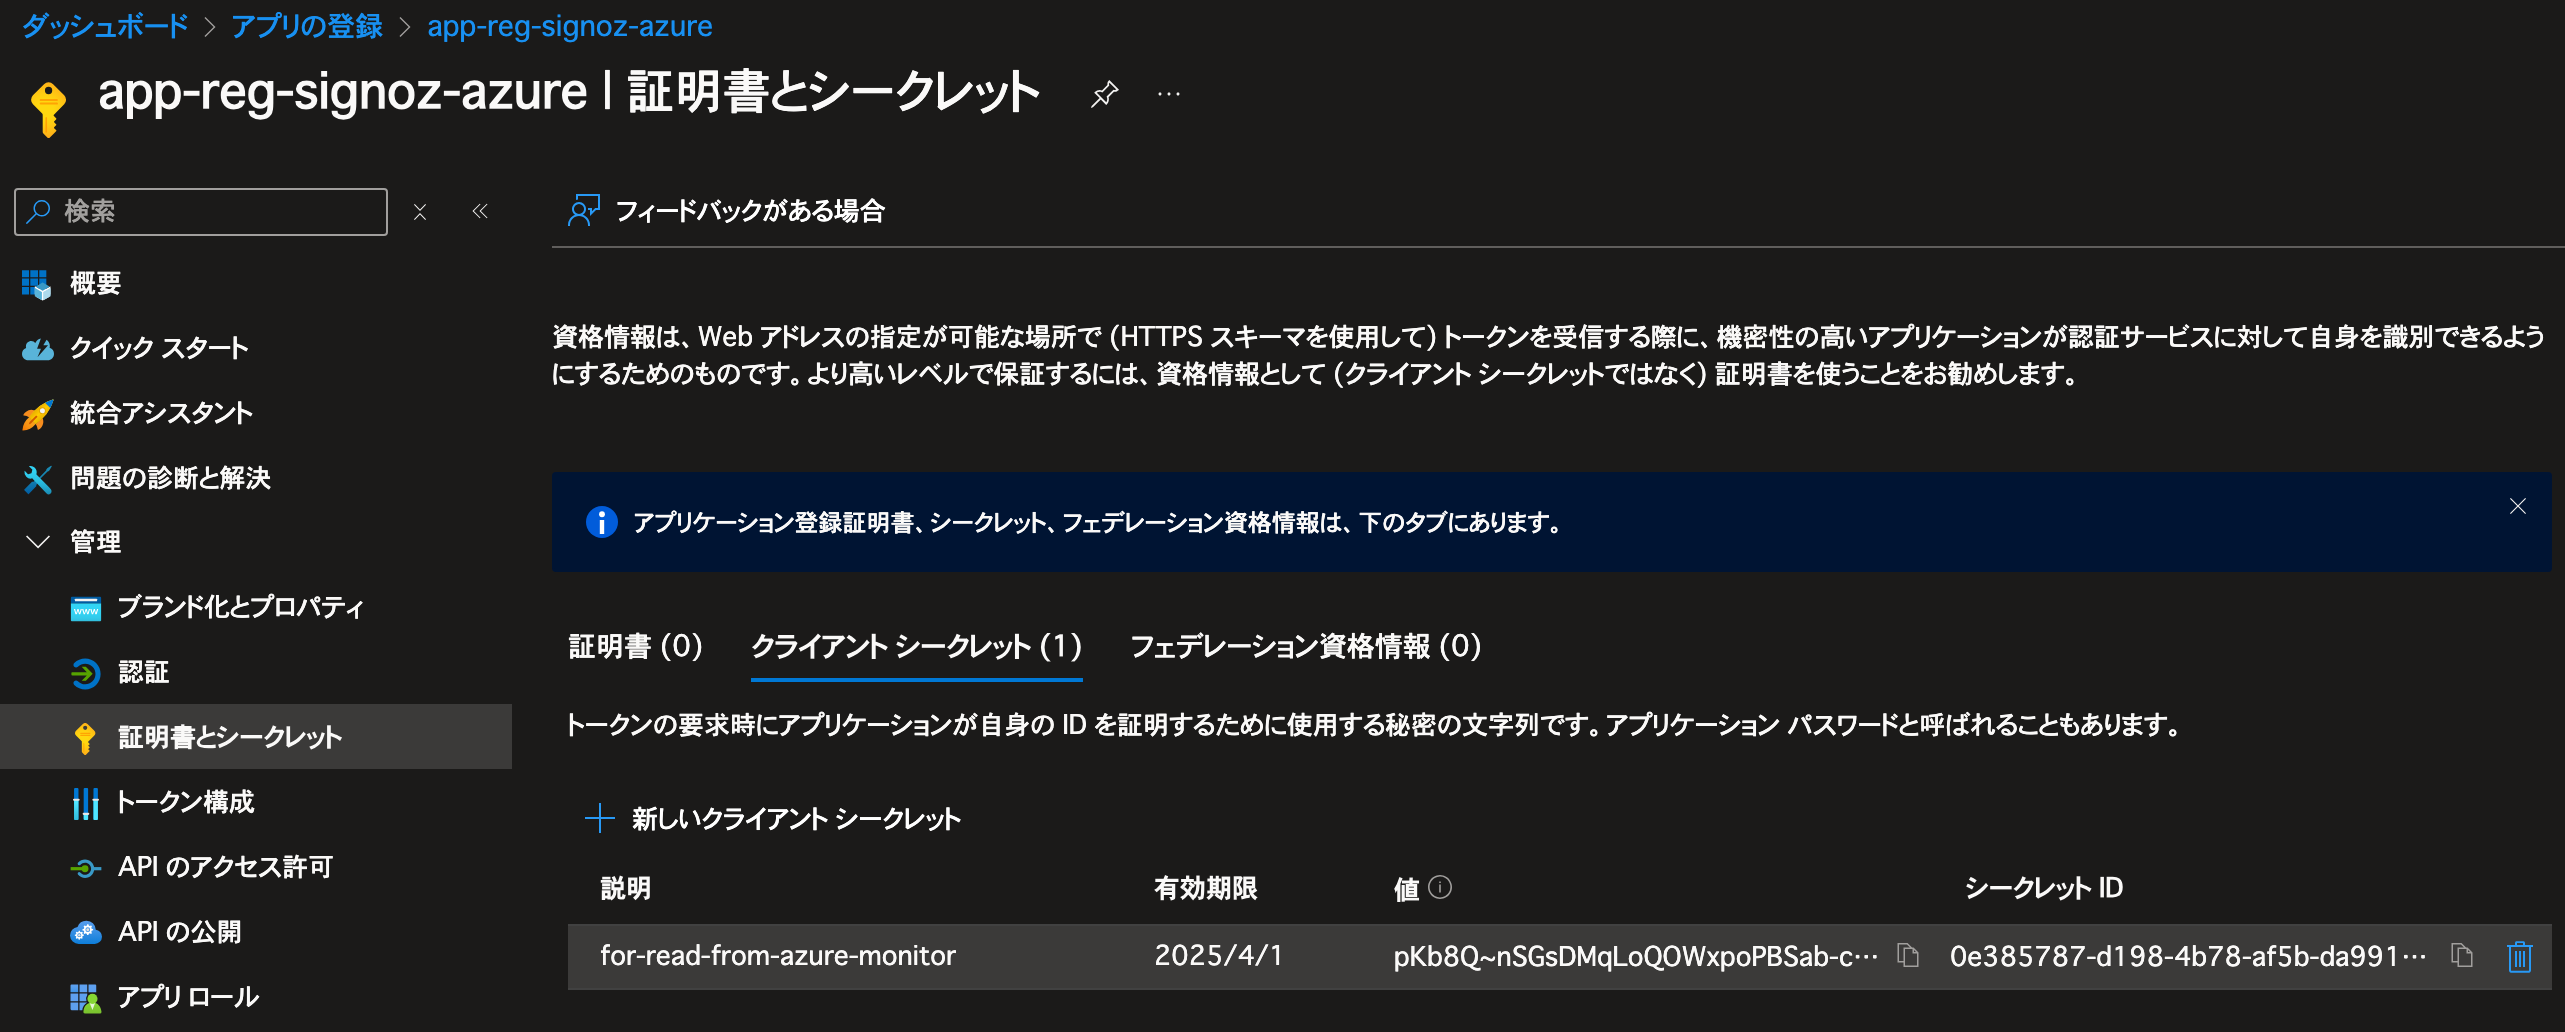
作成できたら 管理 -> 証明書とシークレット から 新しいクライアントシークレット を作成します。
作成されたシークレットの 値 も後ほど利用するので控えておくと良いです。
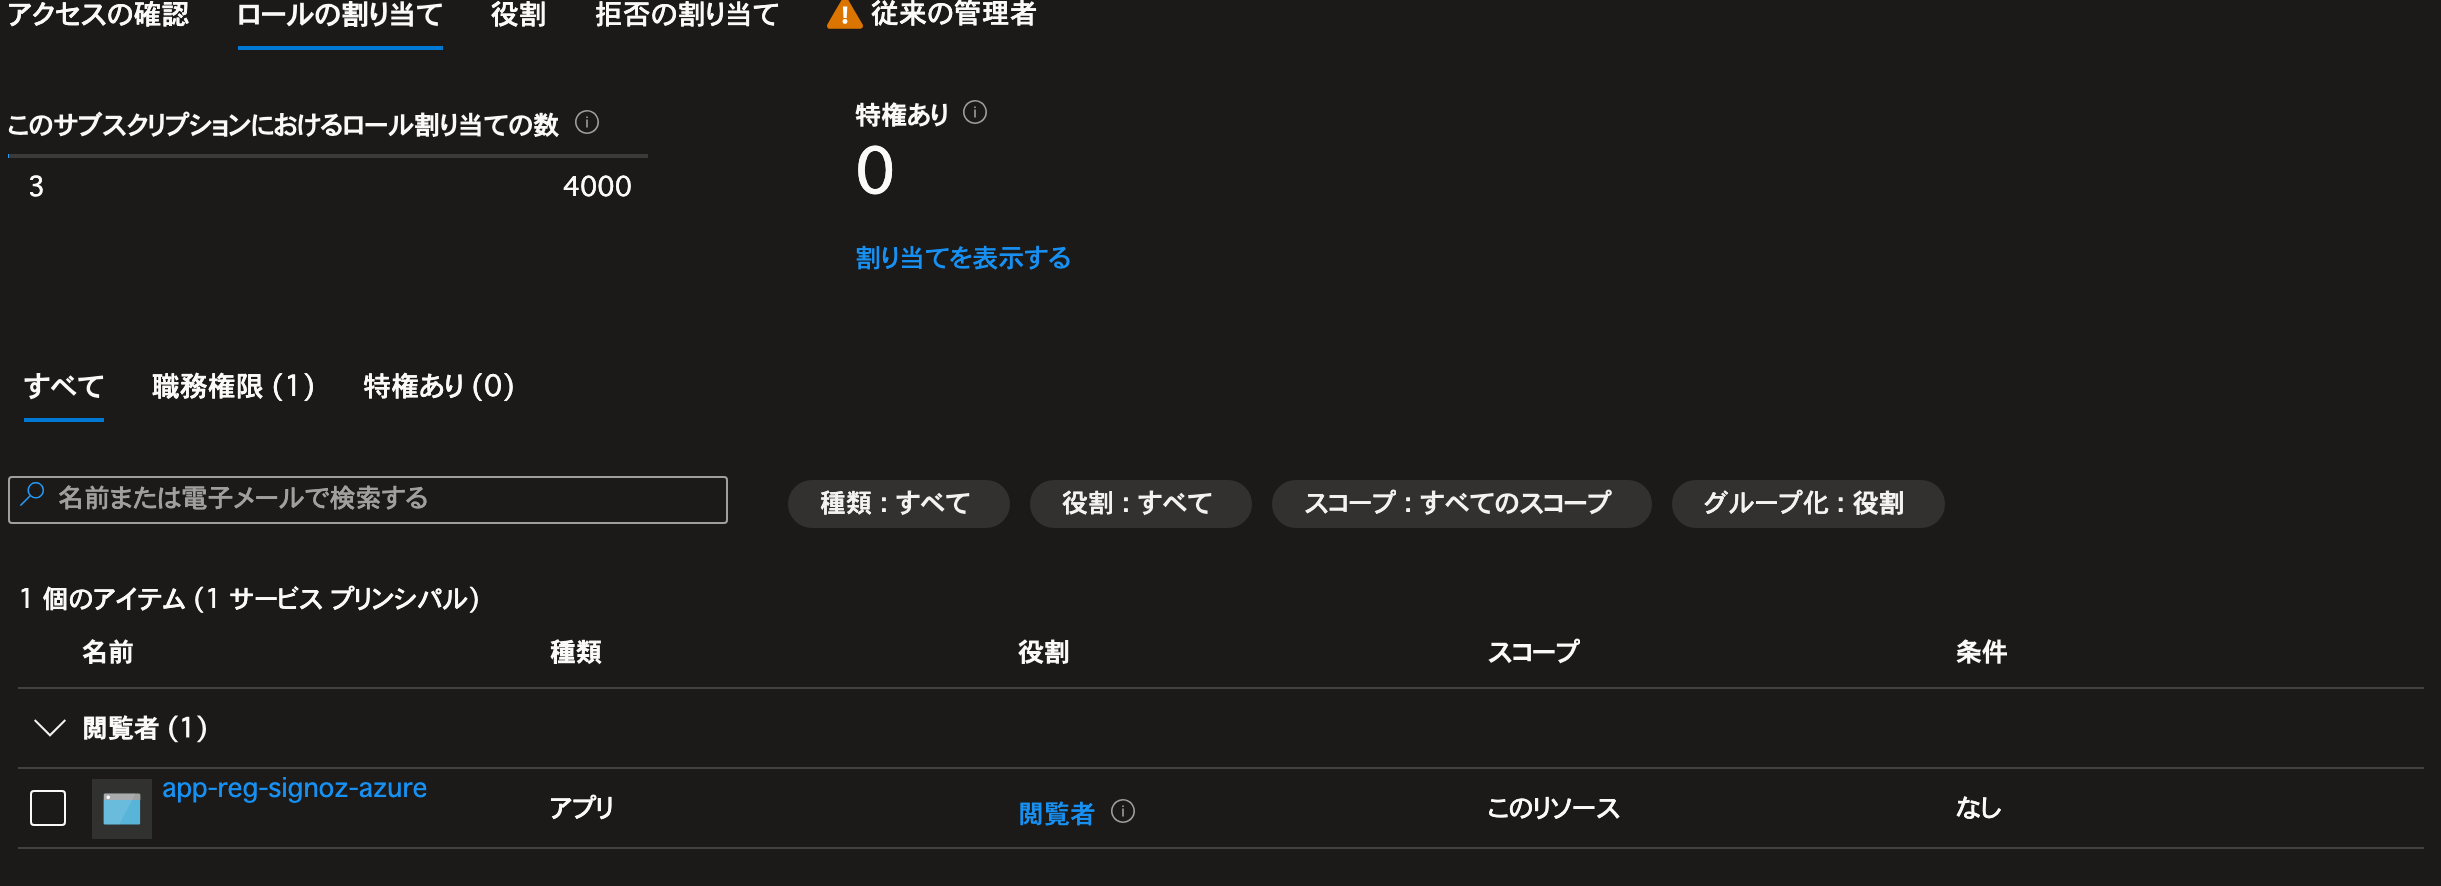
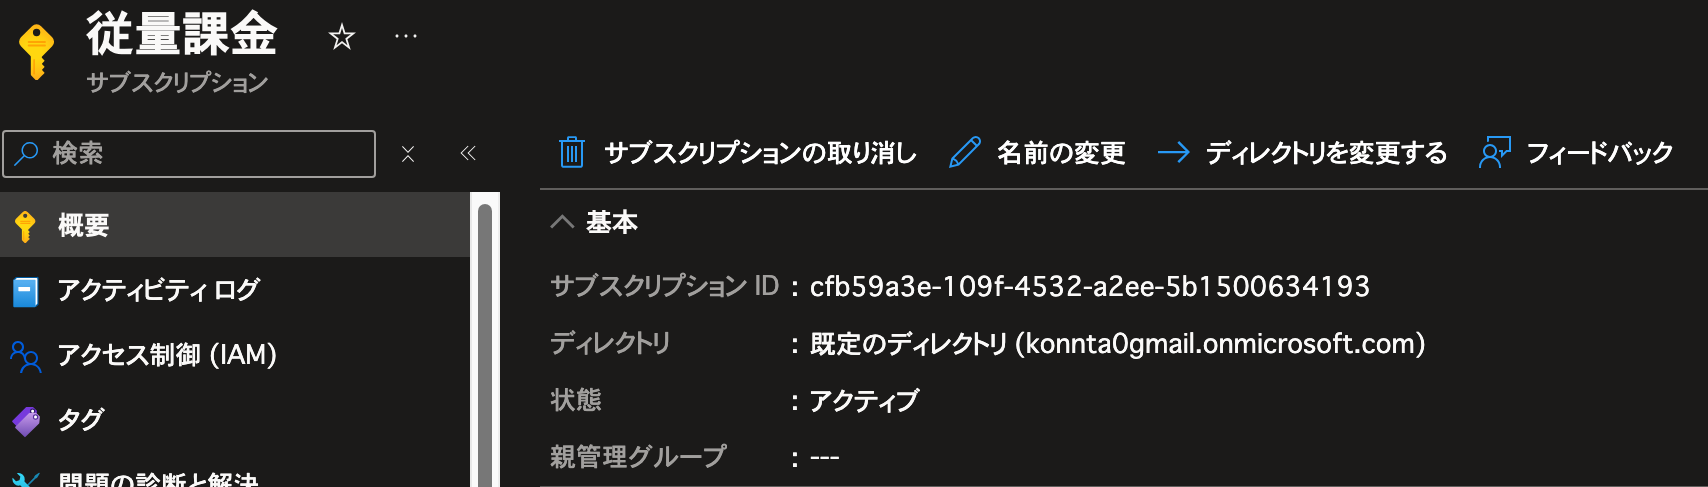
IAM の追加
サブスクリプション -> アクセス制御(IAM) から ロールの割り当ての追加 を行います。
ロール: 閲覧者 を選択し、メンバーとしては先ほど作成したアプリを選択します。
Step4 SigNoz (Standalone)のセットアップ
SigNoz Cloud が 企業向けのメアドが無いと利用が開始できないため、今回は Self-Host します。
参考: https://signoz.io/docs/install/docker/
VM の作成
検証用なので Standard D2s v3 のスポットインスタンスで作成しました。
OS は Linux(Ubuntu) を利用しています。
$ cat /etc/os-release
PRETTY_NAME="Ubuntu 24.04.1 LTS"
NAME="Ubuntu"
VERSION_ID="24.04"
VERSION="24.04.1 LTS (Noble Numbat)"
VERSION_CODENAME=noble
ID=ubuntu
ID_LIKE=debian
HOME_URL="https://www.ubuntu.com/"
SUPPORT_URL="https://help.ubuntu.com/"
BUG_REPORT_URL="https://bugs.launchpad.net/ubuntu/"
PRIVACY_POLICY_URL="https://www.ubuntu.com/legal/terms-and-policies/privacy-policy"
UBUNTU_CODENAME=noble
LOGO=ubuntu-logo
以下の項にあるように Docker を利用するため最低でも 4GB 程度メモリがあった方がよいです。
https://signoz.io/docs/install/docker/#prerequisites
ポートの開放
3301, 4317, 4318 の受信ポートを開放しておきます。
インストールスクリプトの実行
以下を実行します。
Linux 向けのインストールスクリプトでは自動で Docker Engine もインストールされる用です。
(mac OS については手動でインストールが必要)
# インストールスクリプトがあるリポジトリをクローン
$ git clone -b main https://github.com/SigNoz/signoz.git && cd signoz/deploy/
# インストールを実行
$ ./install.sh
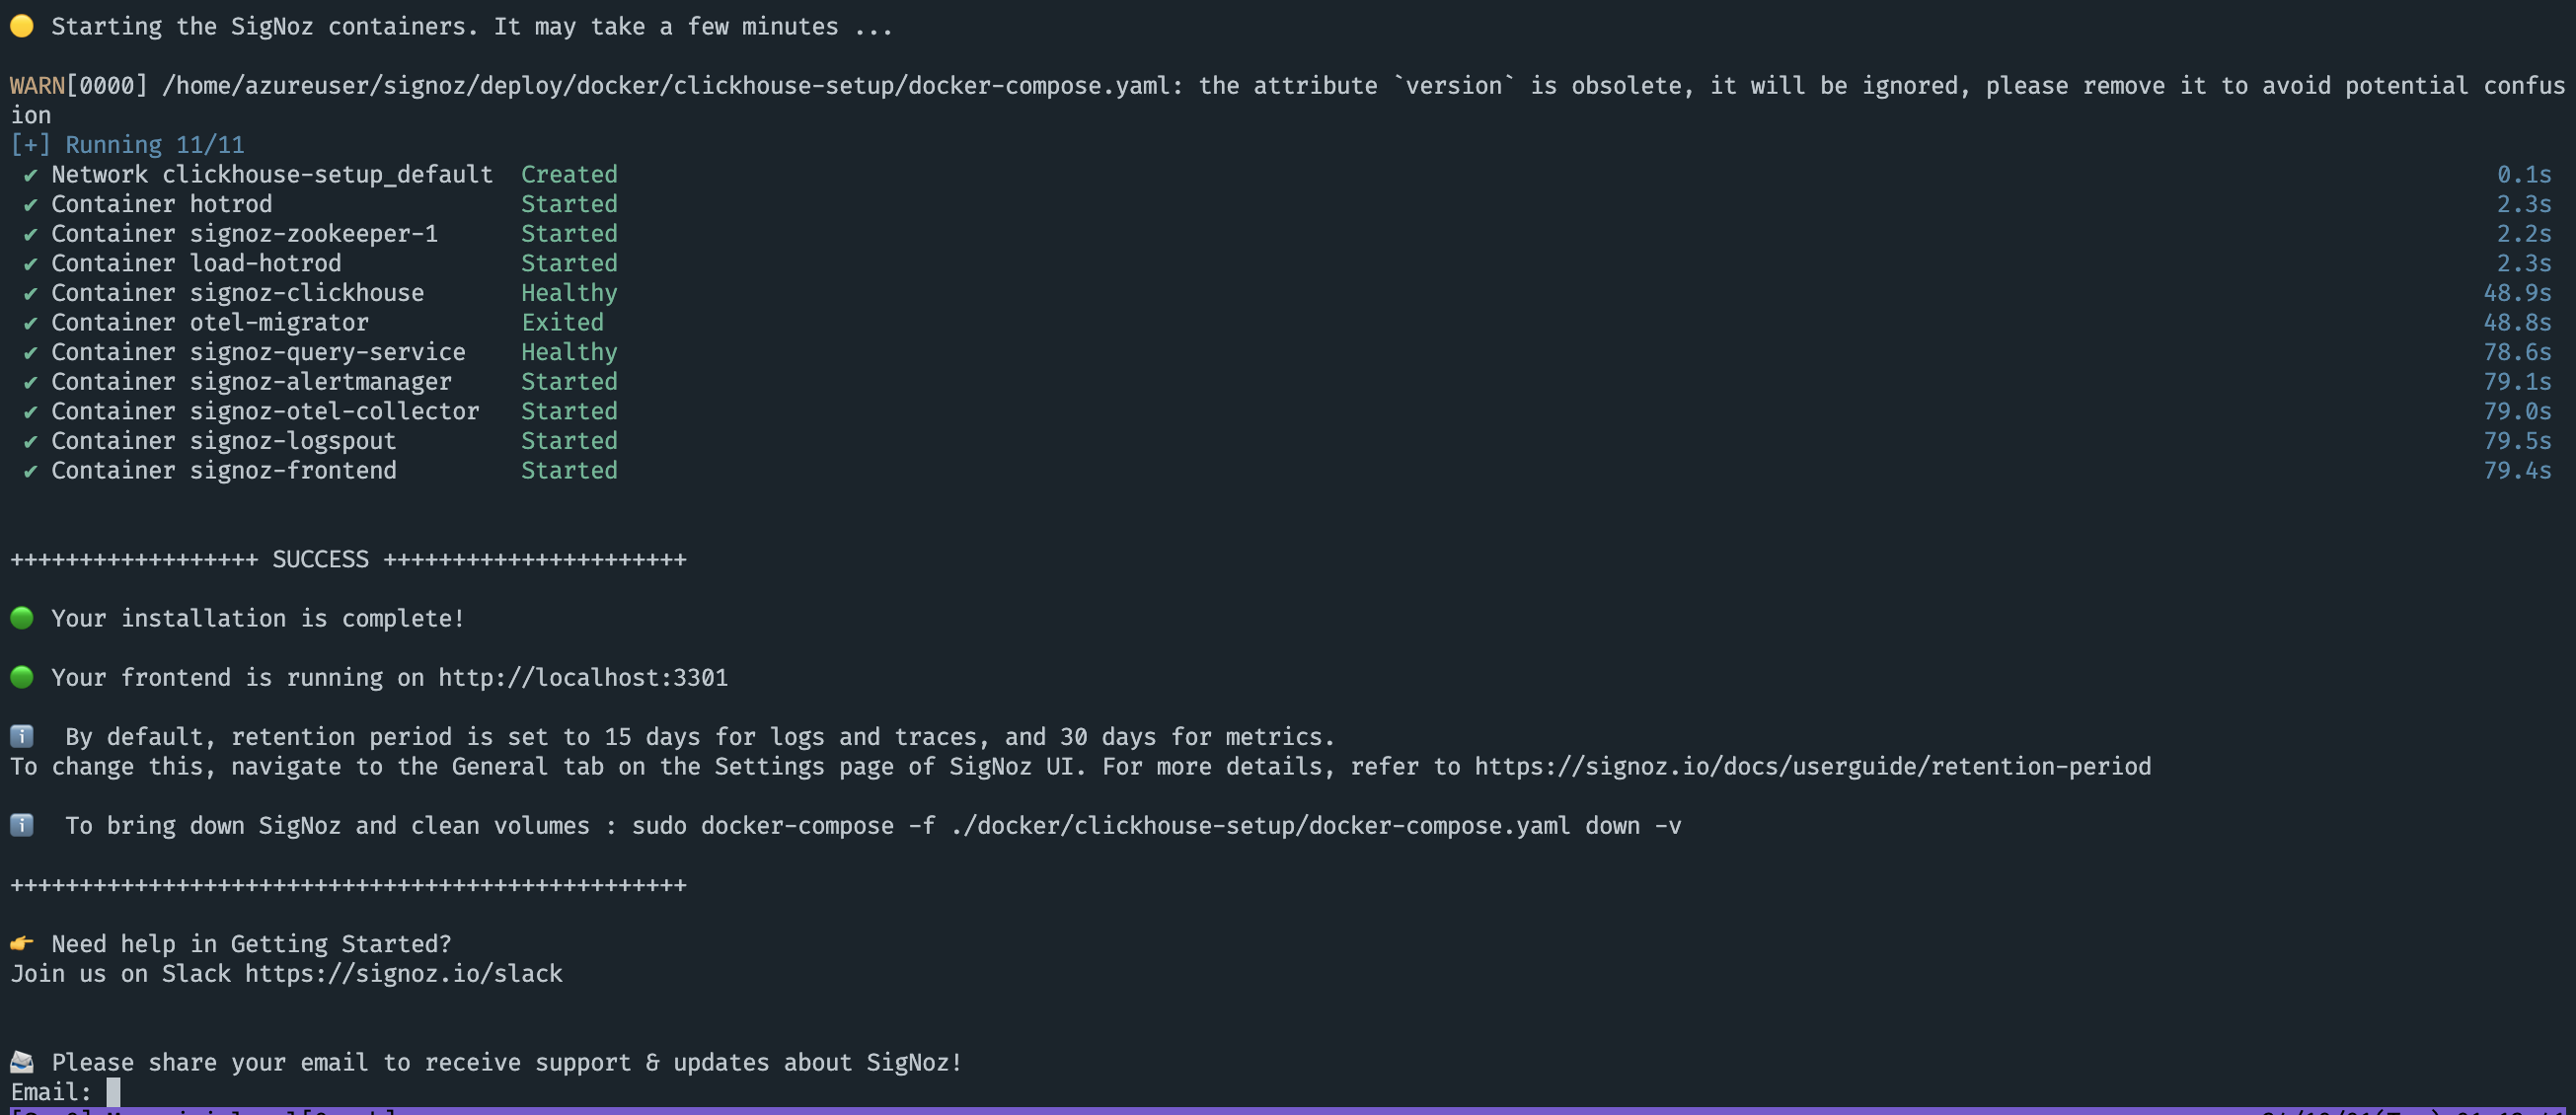
... 自動でインストールが始まります 略...
🟡 Starting the SigNoz containers. It may take a few minutes ...
WARN[0000] /home/azureuser/signoz/deploy/docker/clickhouse-setup/docker-compose.yaml: the attribute `version` is obsolete, it will be ignored, please remove it to avoid potential confusion
[+] Running 11/11
✔ Network clickhouse-setup_default Created 0.1s
✔ Container hotrod Started 2.3s
✔ Container signoz-zookeeper-1 Started 2.2s
✔ Container load-hotrod Started 2.3s
✔ Container signoz-clickhouse Healthy 48.9s
✔ Container otel-migrator Exited 48.8s
✔ Container signoz-query-service Healthy 78.6s
✔ Container signoz-alertmanager Started 79.1s
✔ Container signoz-otel-collector Started 79.0s
✔ Container signoz-logspout Started 79.5s
✔ Container signoz-frontend Started 79.4s
++++++++++++++++++ SUCCESS ++++++++++++++++++++++
🟢 Your installation is complete!
🟢 Your frontend is running on http://localhost:3301
ℹ️ By default, retention period is set to 15 days for logs and traces, and 30 days for metrics.
To change this, navigate to the General tab on the Settings page of SigNoz UI. For more details, refer to https://signoz.io/docs/userguide/retention-period
ℹ️ To bring down SigNoz and clean volumes : sudo docker-compose -f ./docker/clickhouse-setup/docker-compose.yaml down -v
+++++++++++++++++++++++++++++++++++++++++++++++++
👉 Need help in Getting Started?
Join us on Slack https://signoz.io/slack
📨 Please share your email to receive support & updates about SigNoz!
Email:
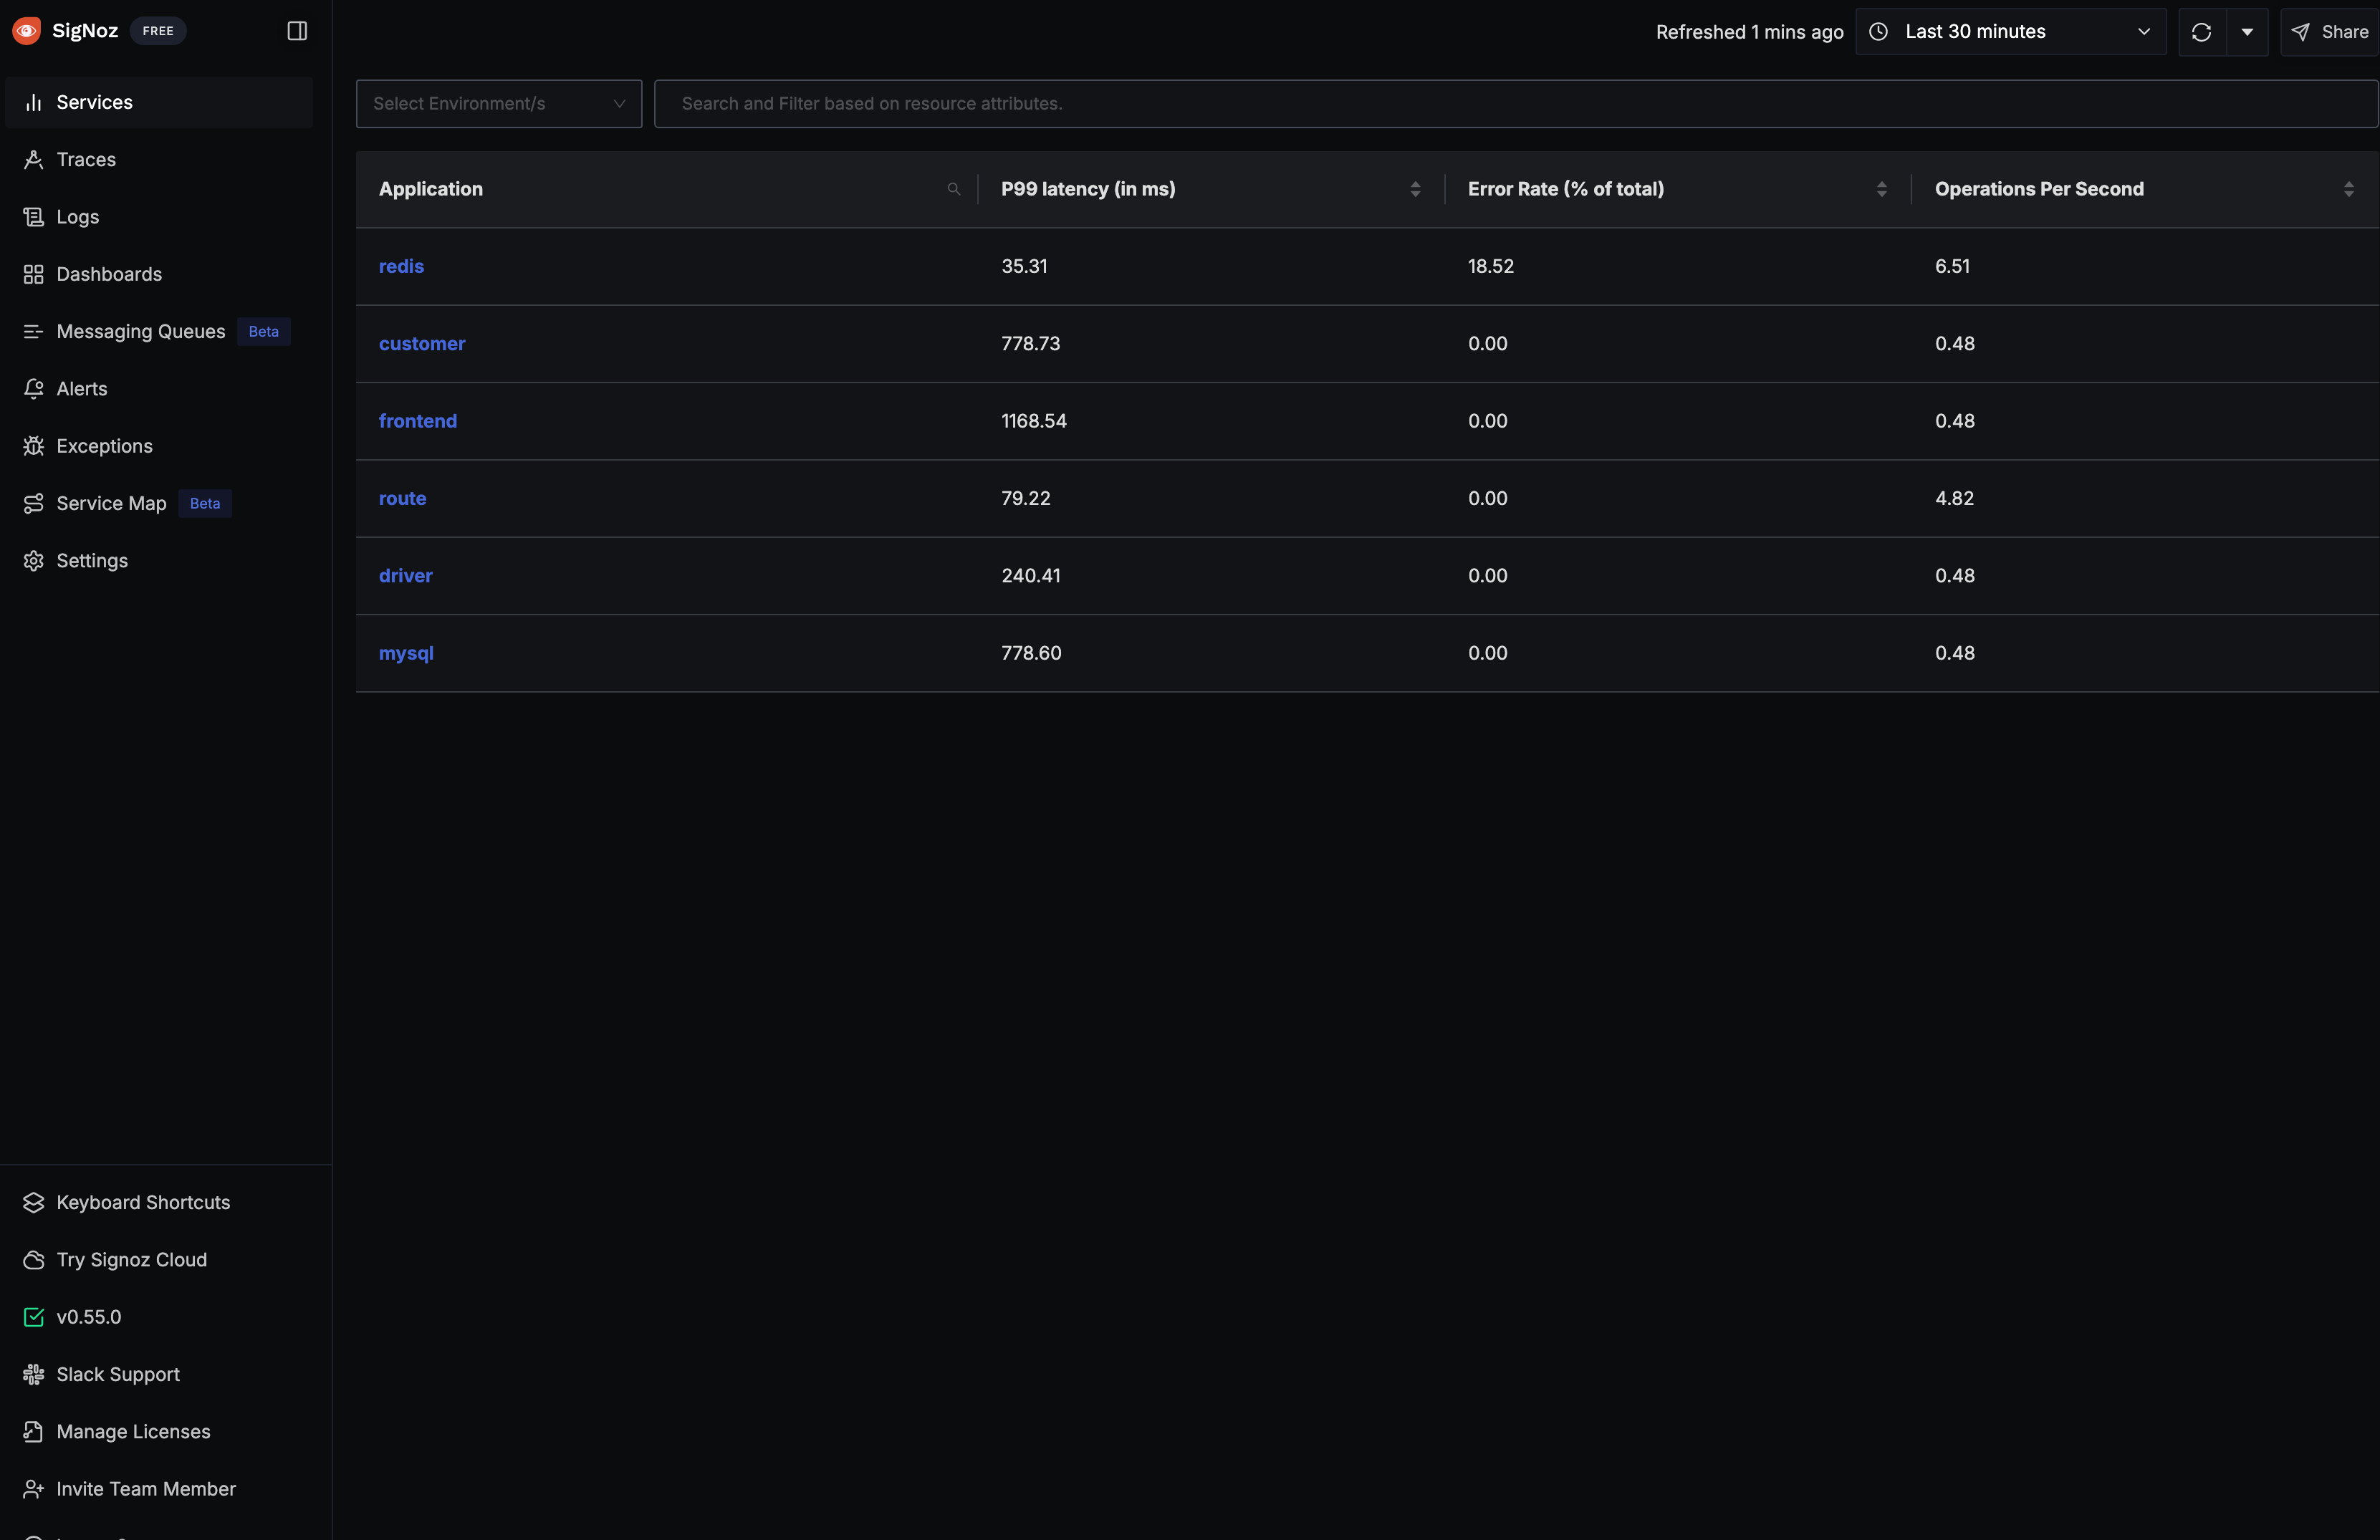
インストールに成功すると Azure VM のパブリック IP:3301 でアクセスが可能です。
ユーザー作成などを終えると以下のような画面にアクセスできます。
停止させたい場合は以下コマンドを実行します。
$ cd signoz/deploy/; sudo docker compose -f ./docker/clickhouse-setup/docker-compose.yaml down
また、ボリューム毎削除したい場合は -v オプション渡して削除します。
$ cd signoz/deploy/; sudo docker compose -f ./docker/clickhouse-setup/docker-compose.yaml down -v
サンプルのサービスの削除
SigNoz ではサンプルのサービスが稼働しています。
ノイズになるので除外する場合は以下で compose を指定して起動します。
$ cd signoz/deploy/; docker compose -f docker/clickhouse-setup/docker-compose-minimal.yaml up -d
もし、当該ファイルが存在しない場合は deploy/docker/clickhouse-setup/docker-compose.yaml の hotrod load-hotrod を削除すればダミーの要求が送られなくなります。
Step4 Central Collector の作成
一元化された OpenTelemetry Collector を作成します。
今回は AKS を利用しないため Azure VM 上に OpenTelemetry Collector を作成します。
サンプルとして手軽なのが VM なだけなので、Container Instance などを用いても OK です。
Azure VM インスタンスの作成
検証用なので Standard D2s v3 のスポットインスタンスで作成しています。
OS は Linux(Ubuntu) を利用しています。
$ cat /etc/os-release
PRETTY_NAME="Ubuntu 24.04.1 LTS"
NAME="Ubuntu"
VERSION_ID="24.04"
VERSION="24.04.1 LTS (Noble Numbat)"
VERSION_CODENAME=noble
ID=ubuntu
ID_LIKE=debian
HOME_URL="https://www.ubuntu.com/"
SUPPORT_URL="https://help.ubuntu.com/"
BUG_REPORT_URL="https://bugs.launchpad.net/ubuntu/"
PRIVACY_POLICY_URL="https://www.ubuntu.com/legal/terms-and-policies/privacy-policy"
UBUNTU_CODENAME=noble
LOGO=ubuntu-logo
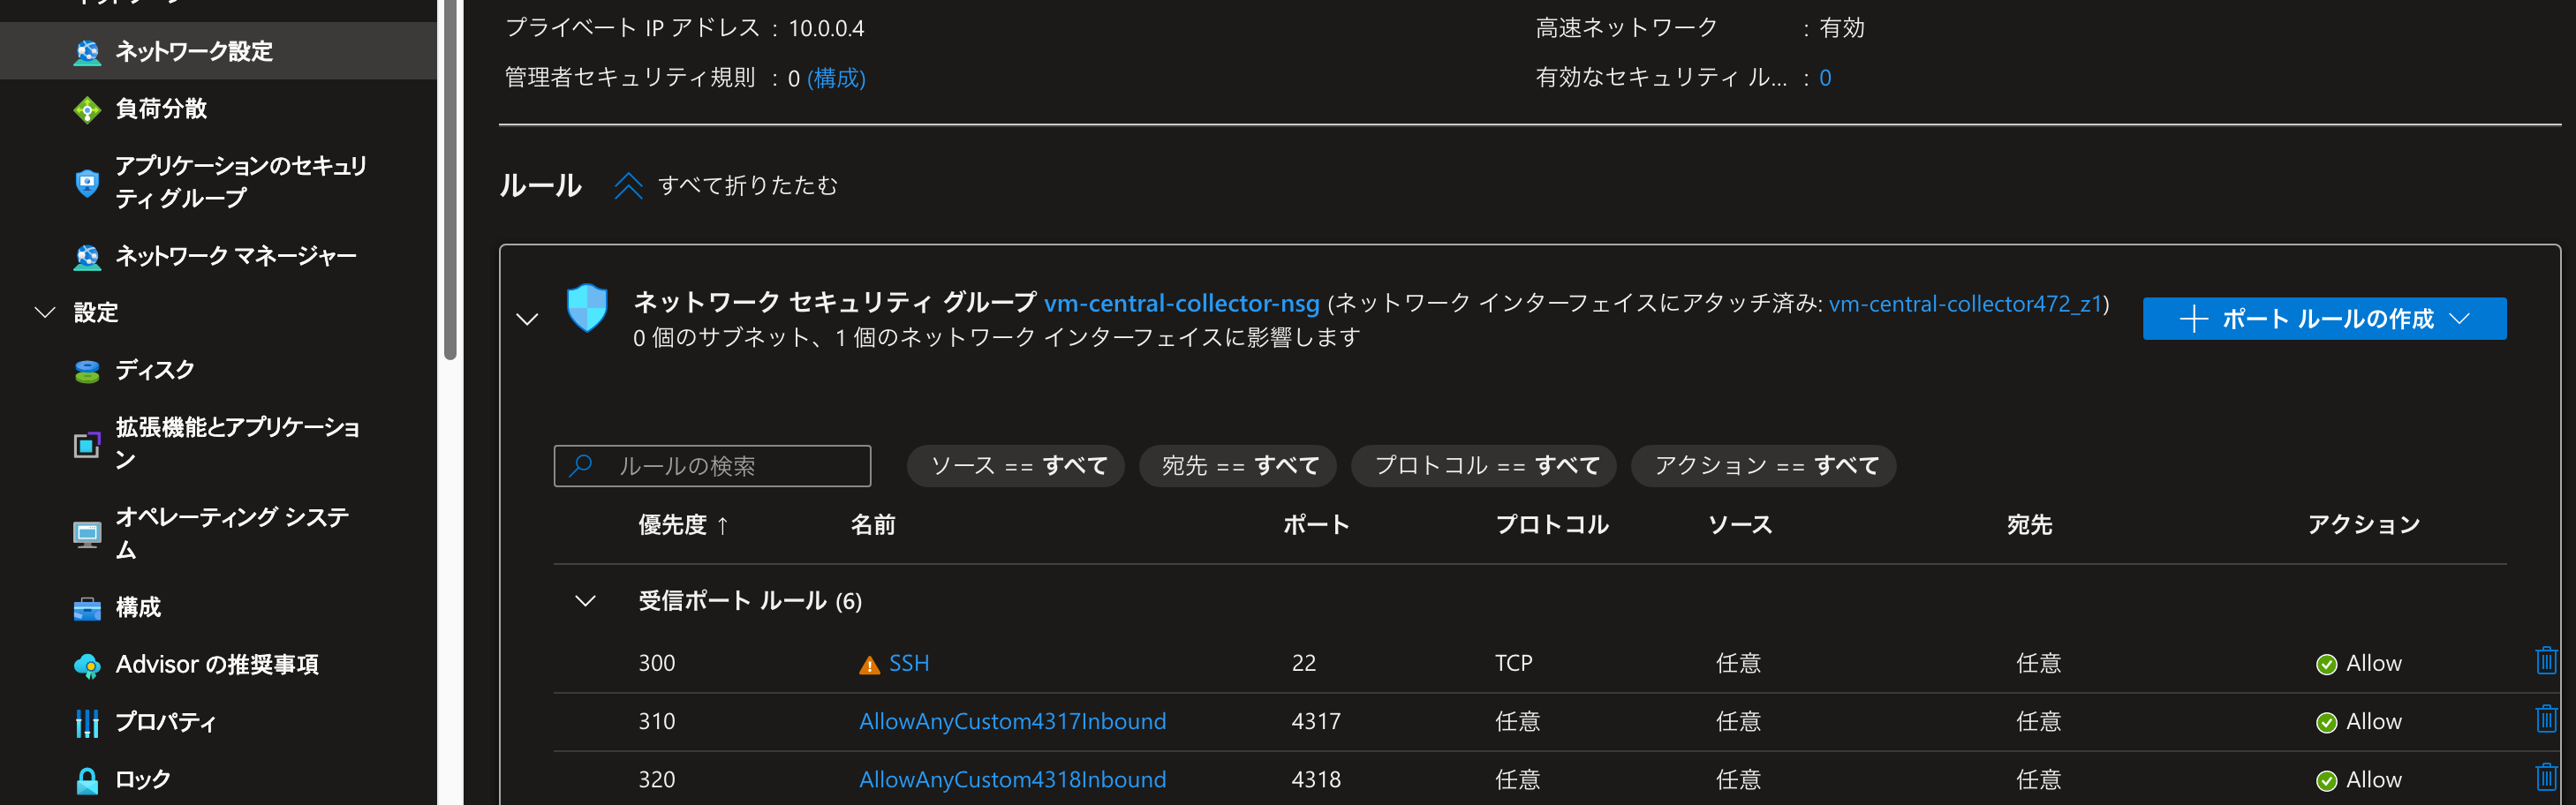
OTLP 向けに 4317, 4318 ポート を受信出来るようにネットワーク設定を変更します。
Azure VM 上にライブラリのインストールと各種設定を行う
今回は Package Manager 経由でインストールして設定を行います。
バイナリを取得して実行する方法もドキュメントには記載されていますので、用途に合わせて選択してください。
参考: https://signoz.io/docs/tutorial/opentelemetry-binary-usage-in-virtual-machine/
また、今回は SigNoz の Self-Host 版を利用します。
バージョンは検証時は v0.88.0 でした。
$ wget https://github.com/open-telemetry/opentelemetry-collector-releases/releases/download/v0.88.0/otelcol-contrib_0.88.0_linux_amd64.deb

$ sudo dpkg -i otelcol-contrib_0.88.0_linux_amd64.deb
ログを確認する場合は以下コマンドを実行します。
$ sudo journalctl -u otelcol-contrib.service
サービスを停止する場合は以下を実行します。
$ sudo systemctl stop otelcol-contrib.service
/etc/otelcol-contrib/config.yaml を作成して以下を記載します。
また、 azureeventhub, azuremonitor, exporters.otlp.endpoint にそれぞれ値を設定します。
service:
  pipelines:
    metrics/am:
      receivers: [azuremonitor]
      exporters: [otlp]
    traces:
      receivers: [otlp]
      processors: [batch]
      exporters: [otlp]
    metrics:
      receivers: [otlp]
      processors: [batch]
      exporters: [otlp]
    logs:
      receivers: [otlp, azureeventhub]
      processors: [batch]
      exporters: [otlp]
receivers:
  otlp:
    protocols:
      grpc:
        endpoint: 0.0.0.0:4317
      http:
        endpoint: 0.0.0.0:4318
  azureeventhub:
    connection: <Primary Connection String>
    format: "azure"
  azuremonitor:
    subscription_id: "<Subscription ID>"
    tenant_id: "<AD Tenant ID>"
    client_id: "<Client ID>"
    client_secret: "<Client Secret>"
    resource_groups: ["<rg-1>"]
    collection_interval: 60s
processors:
  batch: {}
exporters:
  otlp:
    endpoint: "<IP of machine hosting SigNoz>:4317"
    tls:
      insecure: true
設定を反映させる為にサービスを再起動します。
sudo systemctl restart otelcol-contrib.service

$ sudo systemctl status otelcol-contrib.service
● otelcol-contrib.service - OpenTelemetry Collector Contrib
     Loaded: loaded (/usr/lib/systemd/system/otelcol-contrib.service; enabled; preset: enabled)
     Active: active (running) since Sun 2024-09-29 15:44:44 UTC; 13s ago
   Main PID: 1478 (otelcol-contrib)
      Tasks: 7 (limit: 9459)
     Memory: 44.0M (peak: 44.3M)
        CPU: 182ms
     CGroup: /system.slice/otelcol-contrib.service
             └─1478 /usr/bin/otelcol-contrib --config=/etc/otelcol-contrib/config.yaml
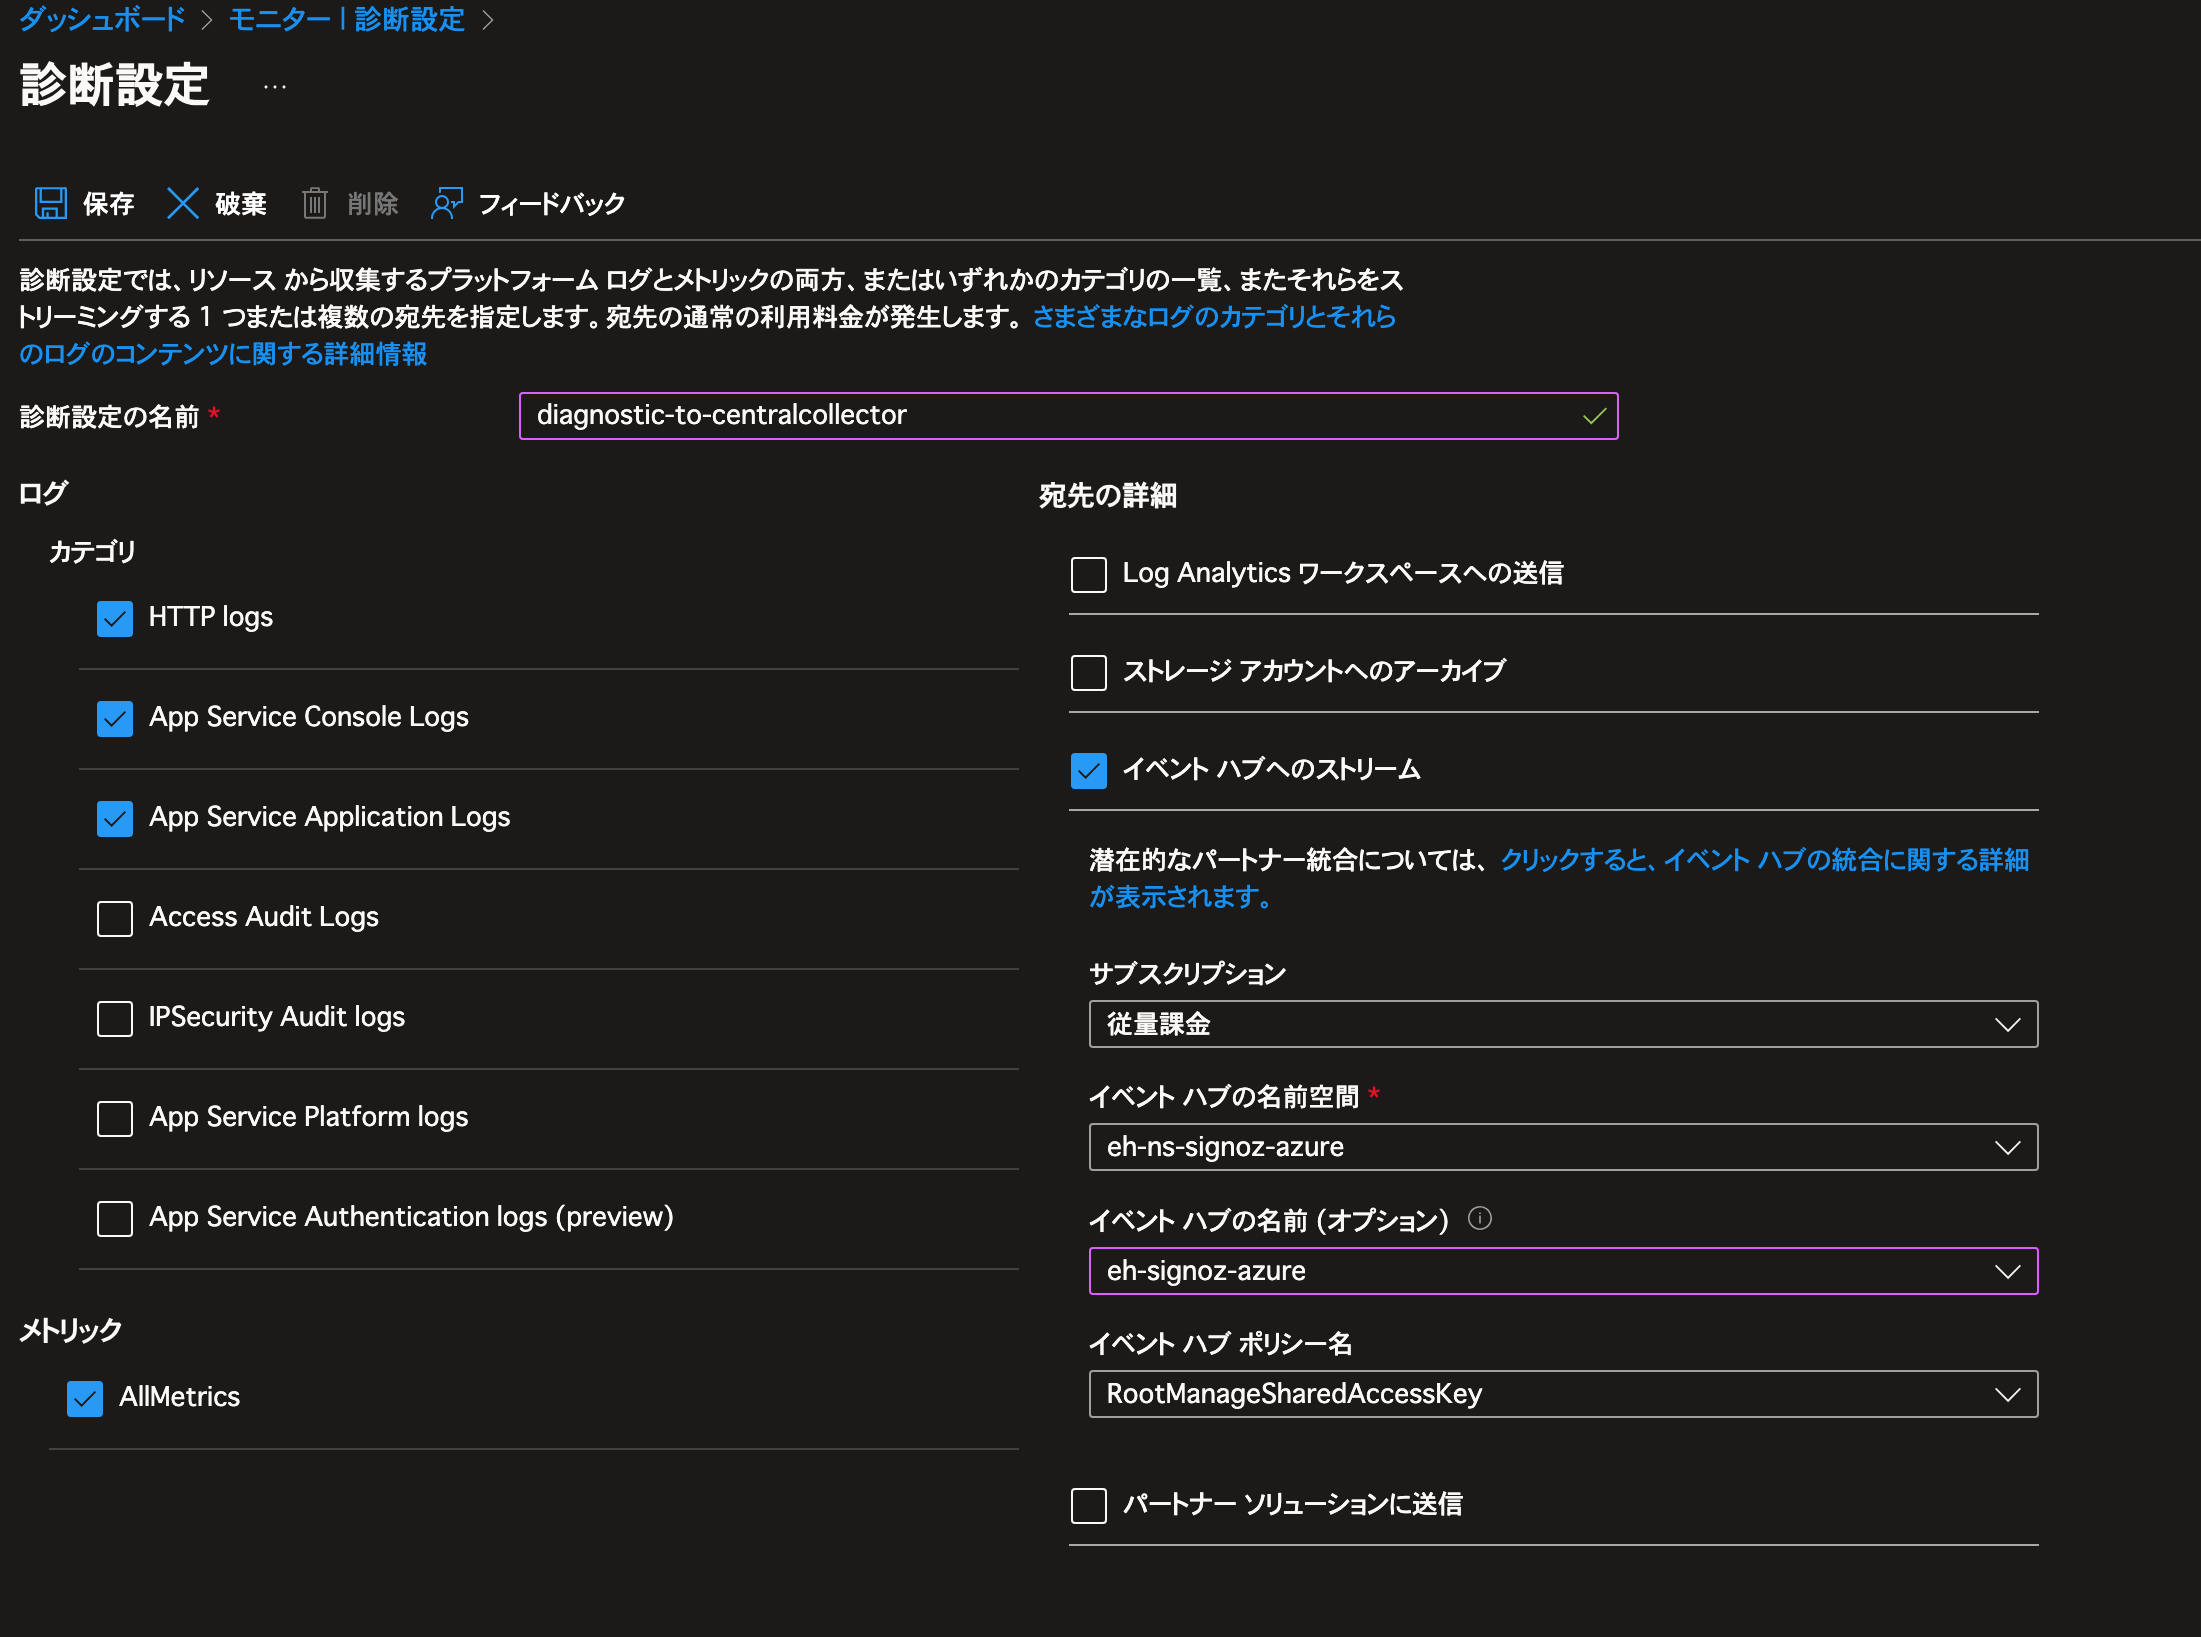
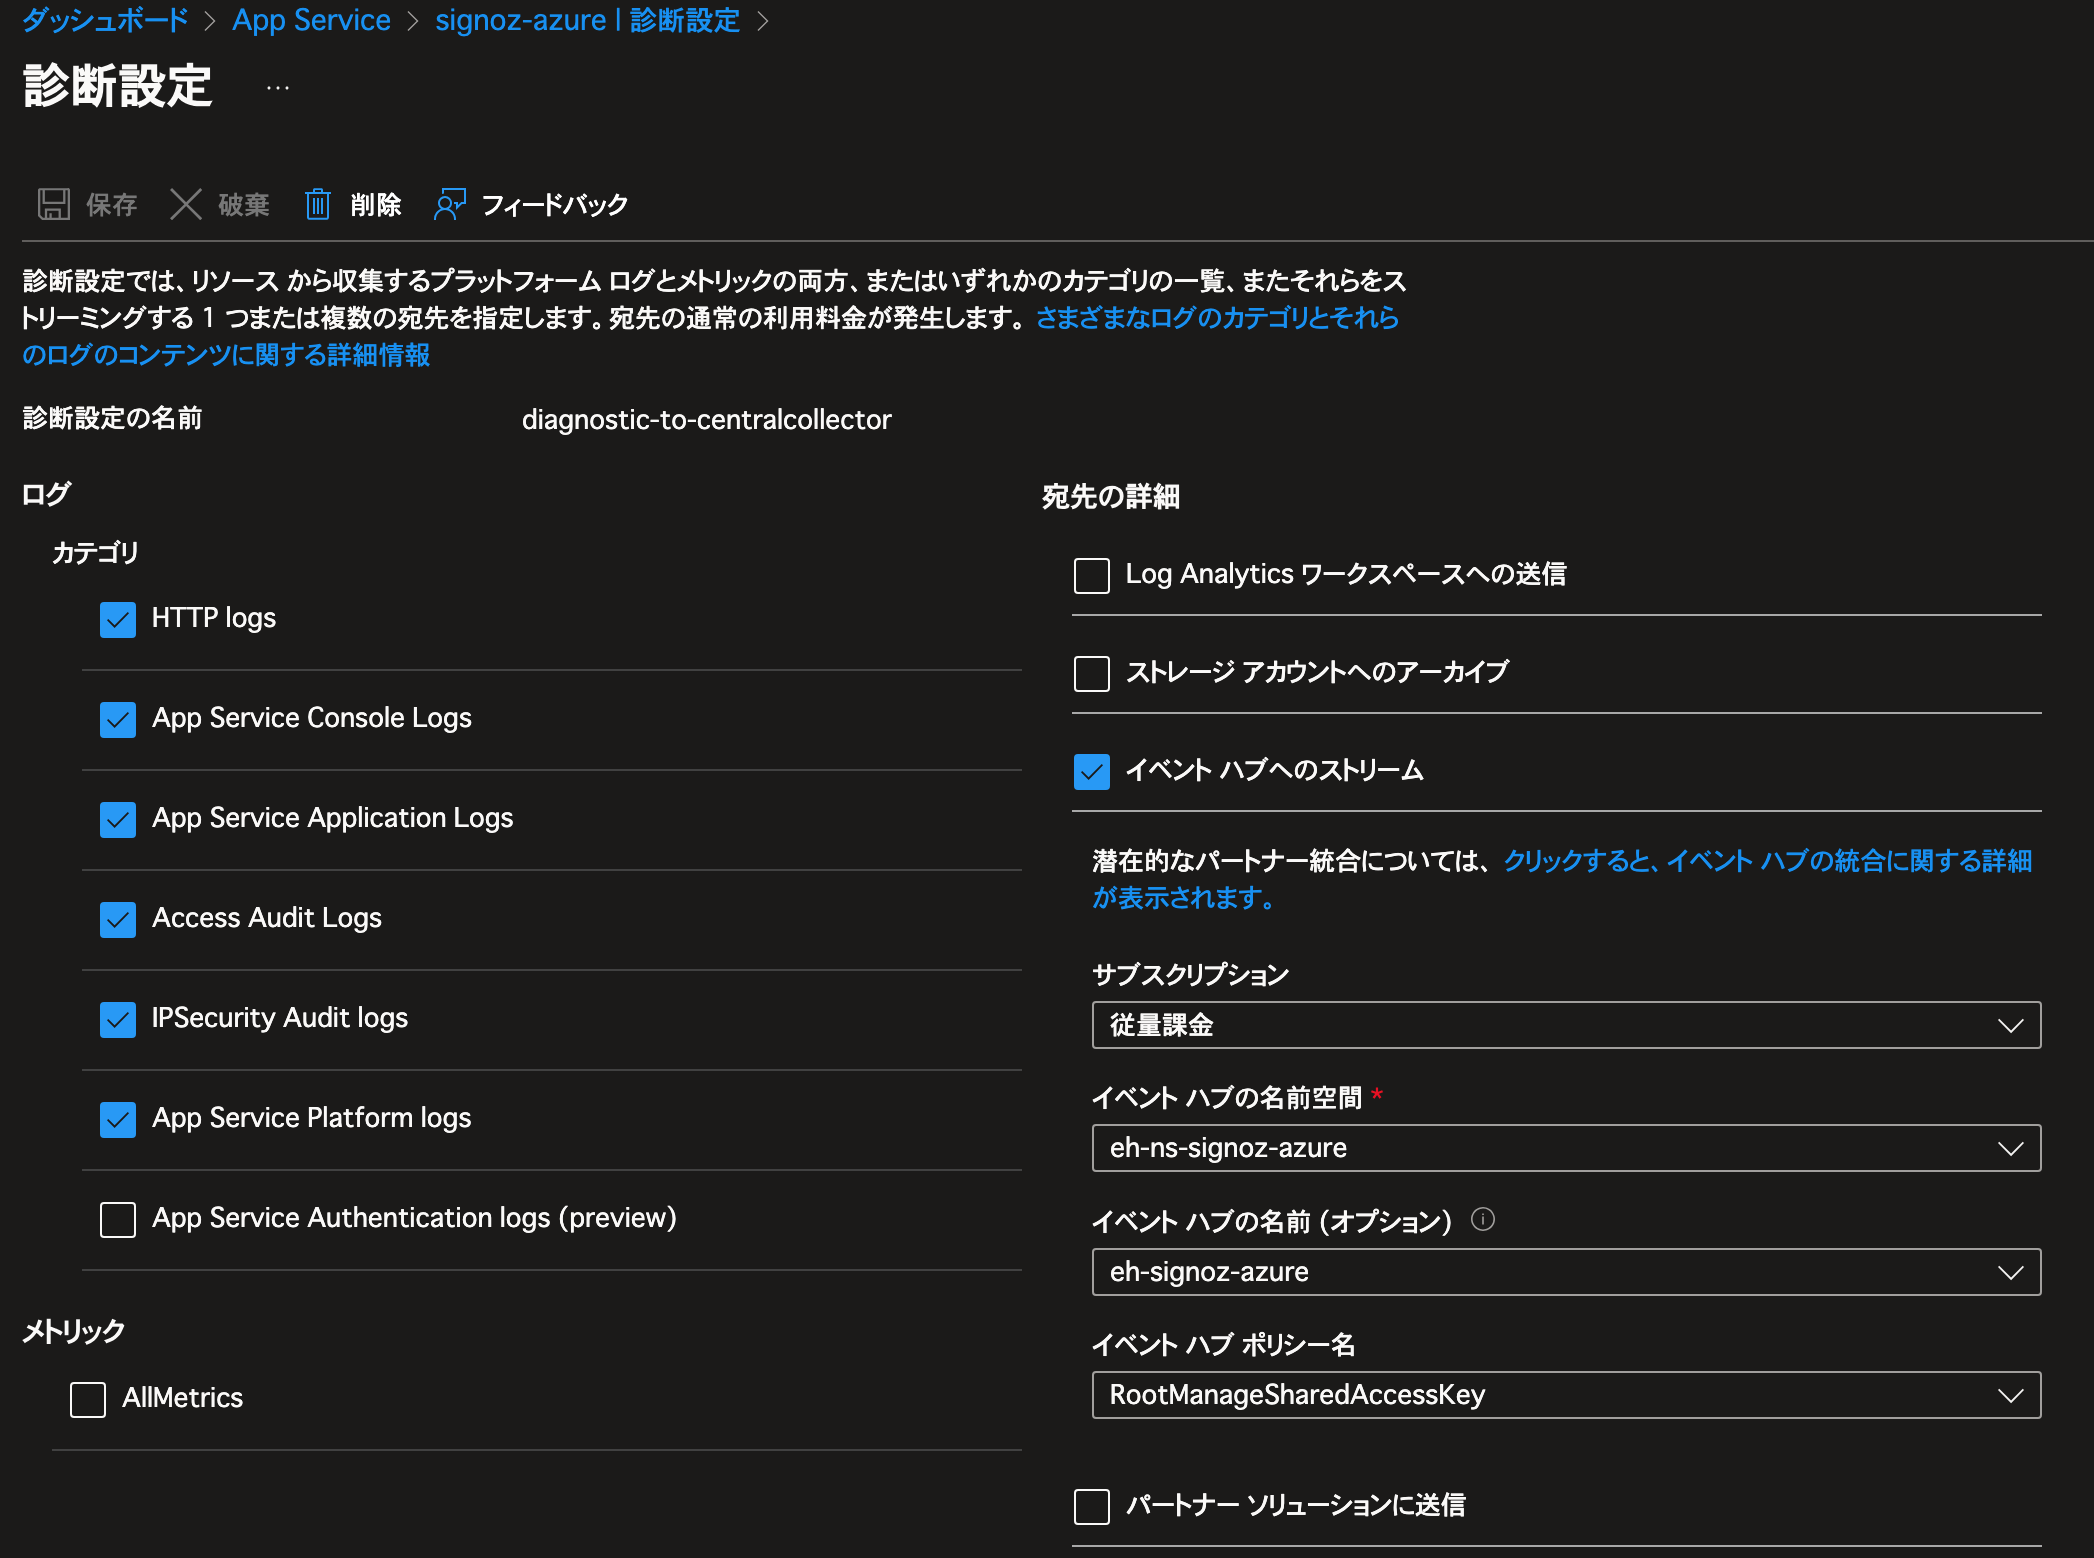
App Service のログを SigNoz で表示する
先ほど作成した App Service の 診断設定 -> 診断設定を追加する から設定を追加します。
エクスポートしたい。ログのカテゴリを選択し、
宛先の詳細 を イベント ハブへのストリーム 選びます。
サブスクリプション、イベントハブの名前空間 ... などは前述のステップで作成したものを選択します。
イベント ハブ ポリシー名 は作成時に自動的に存在する "RootManageSharedAccessKey" で良いです。
参考: https://signoz.io/docs/azure-monitoring/app-service/logging/
諸々の動作確認
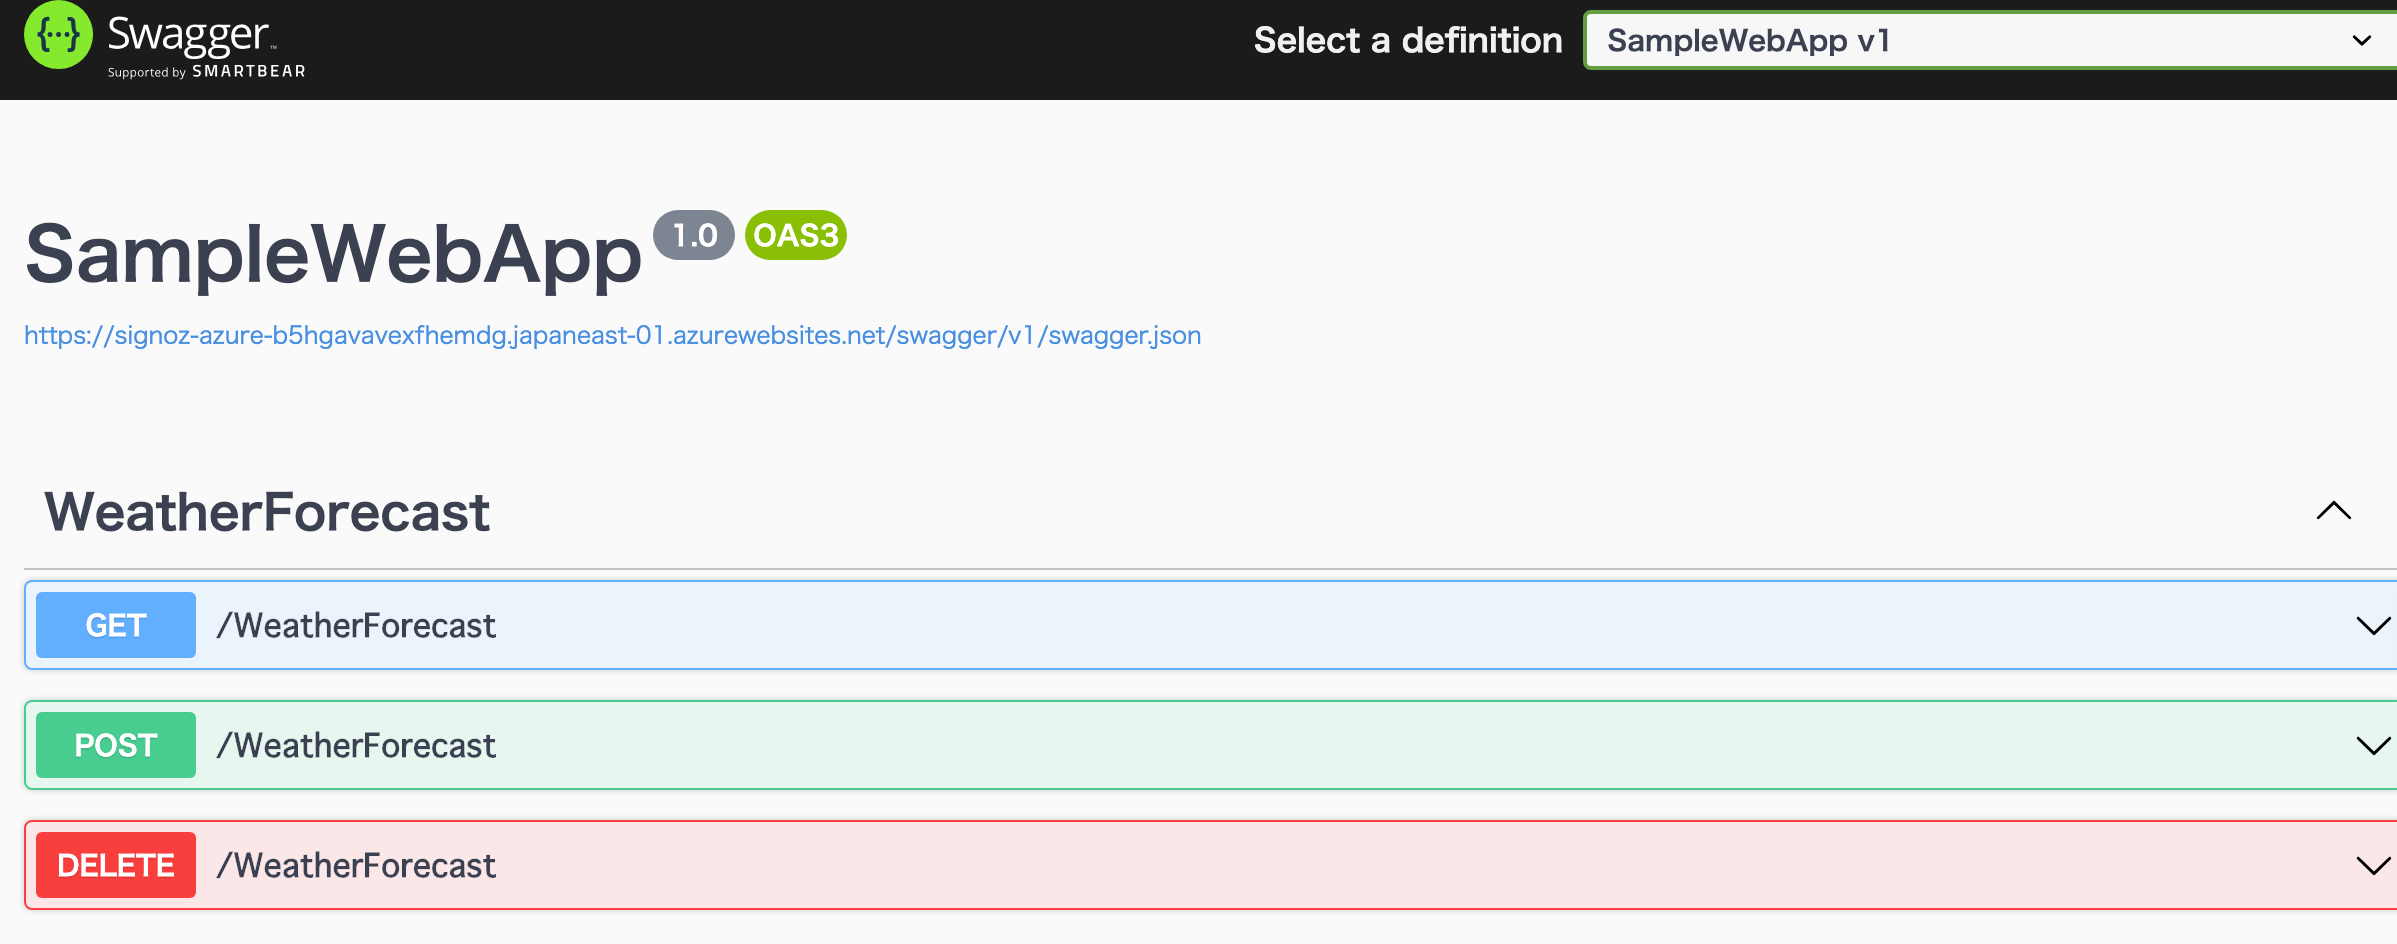
前述でデプロイした C# サーバーアプリケーションは Swagger が有効になっています。
https://path.to.domain/swagger/index.html から Swagger で API を実行して動作確認をしていきます。
サンプルとして GET, POST, DELETE のメソッドの API を実装しています。
App Service のログを SigNoz で確認する
SigNoz の "Logs" ページから確認ができます。
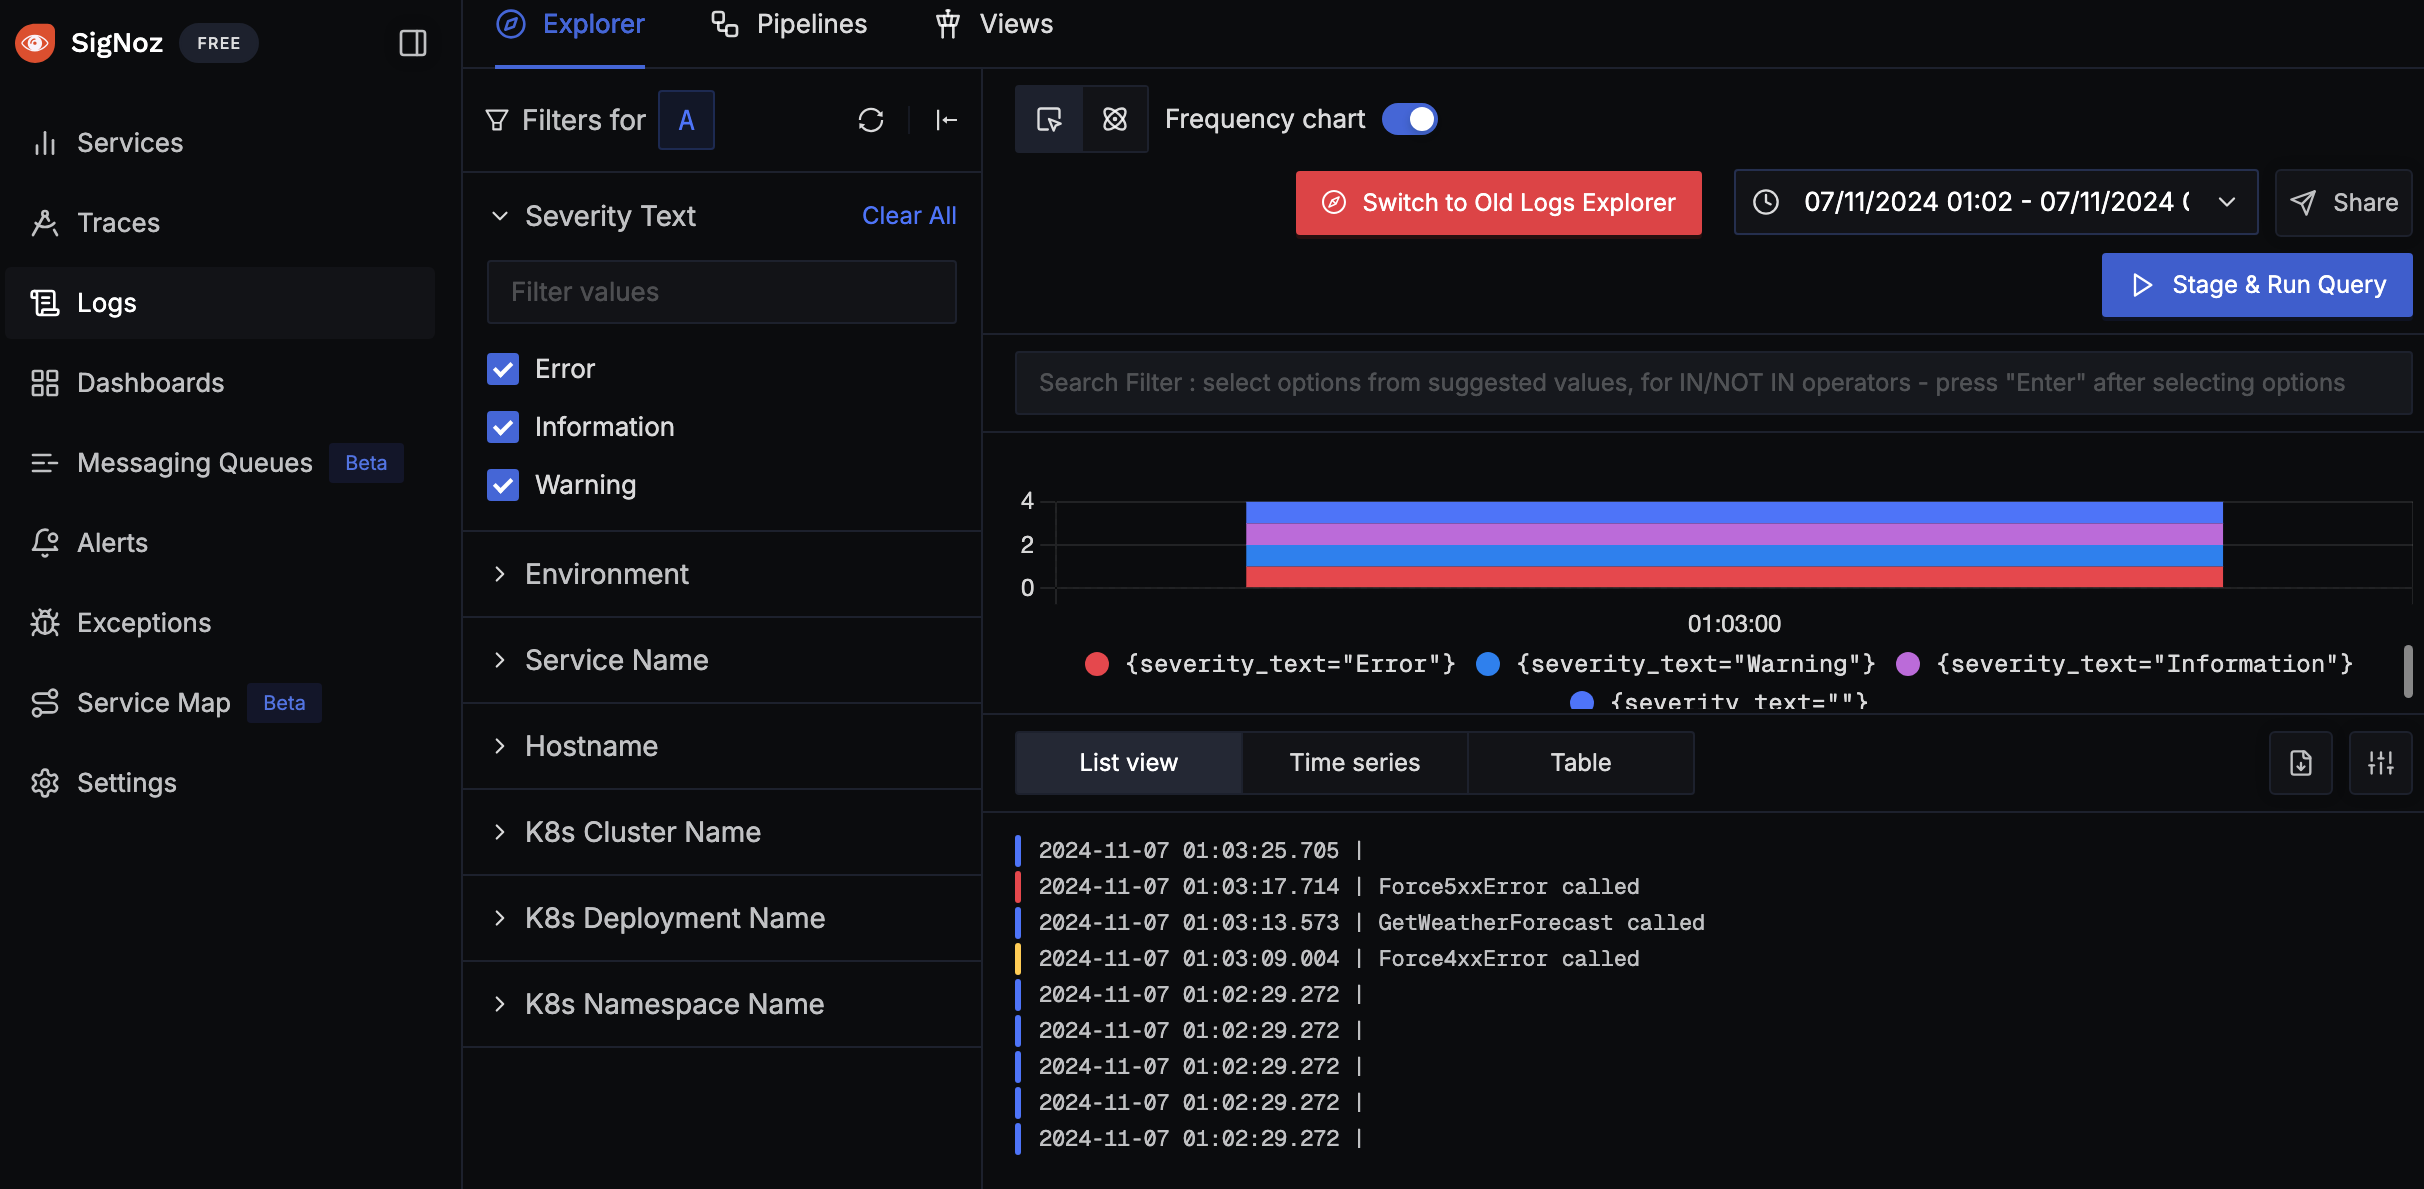
システムログ
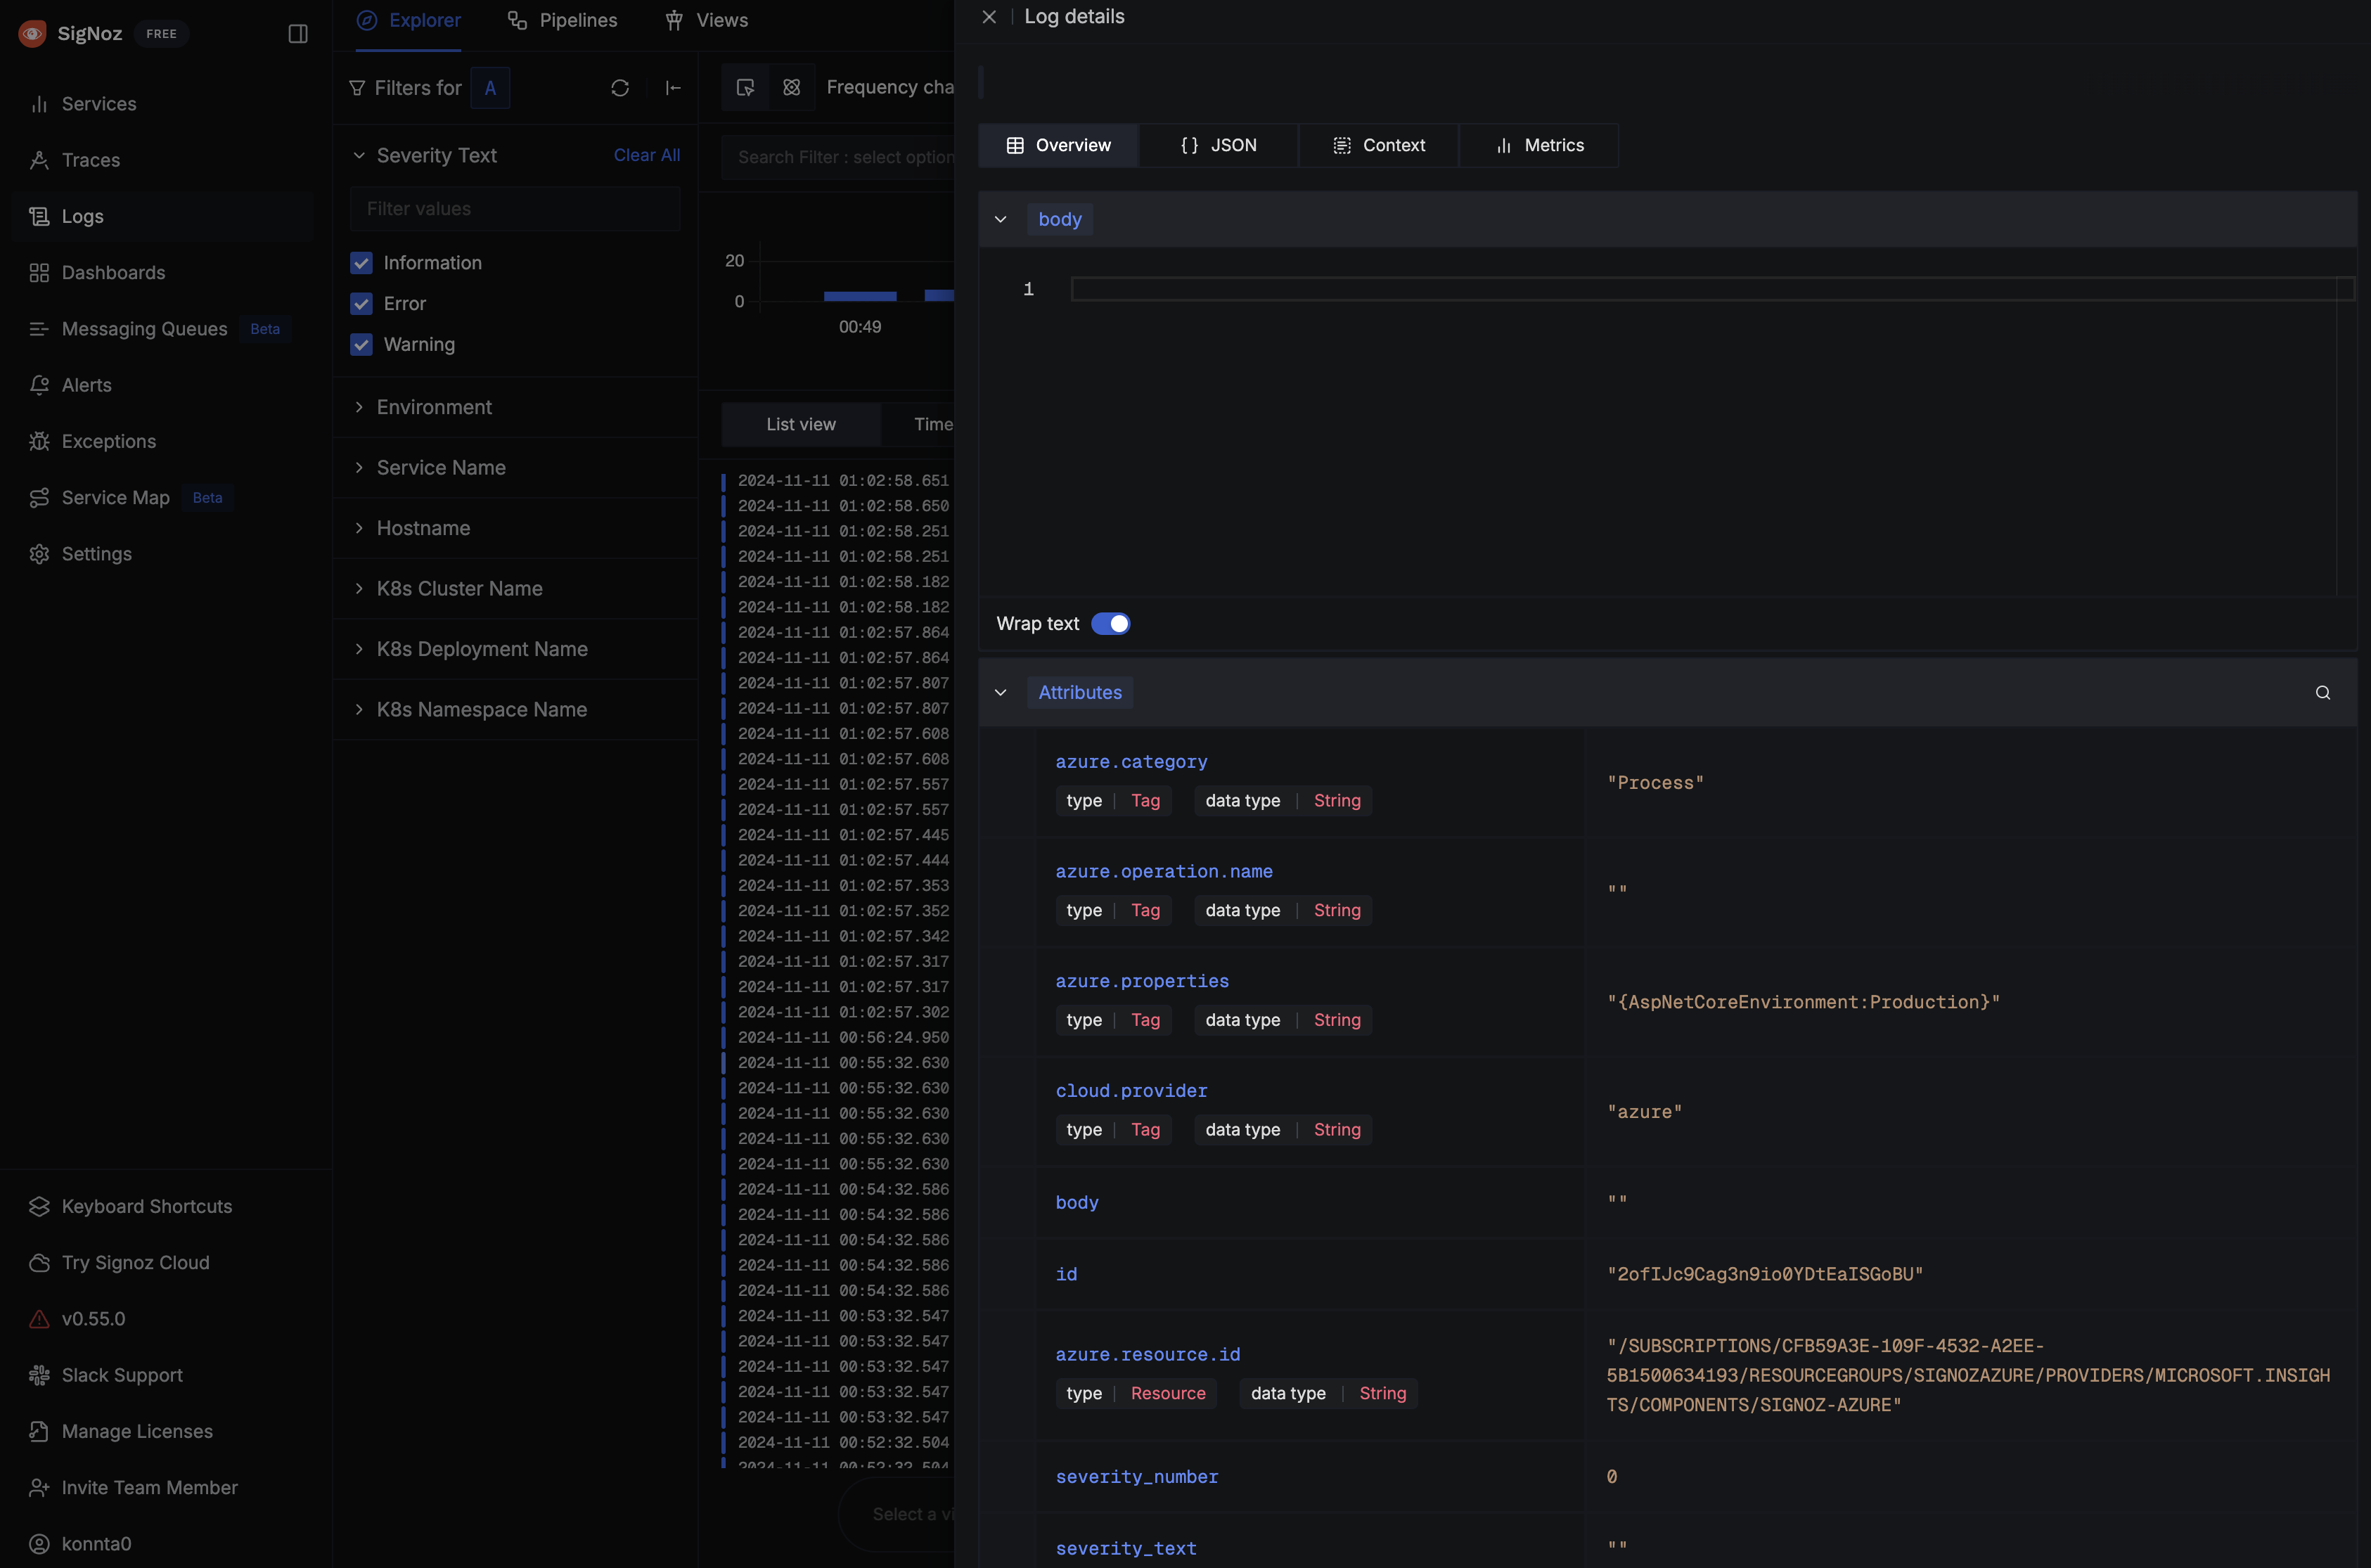
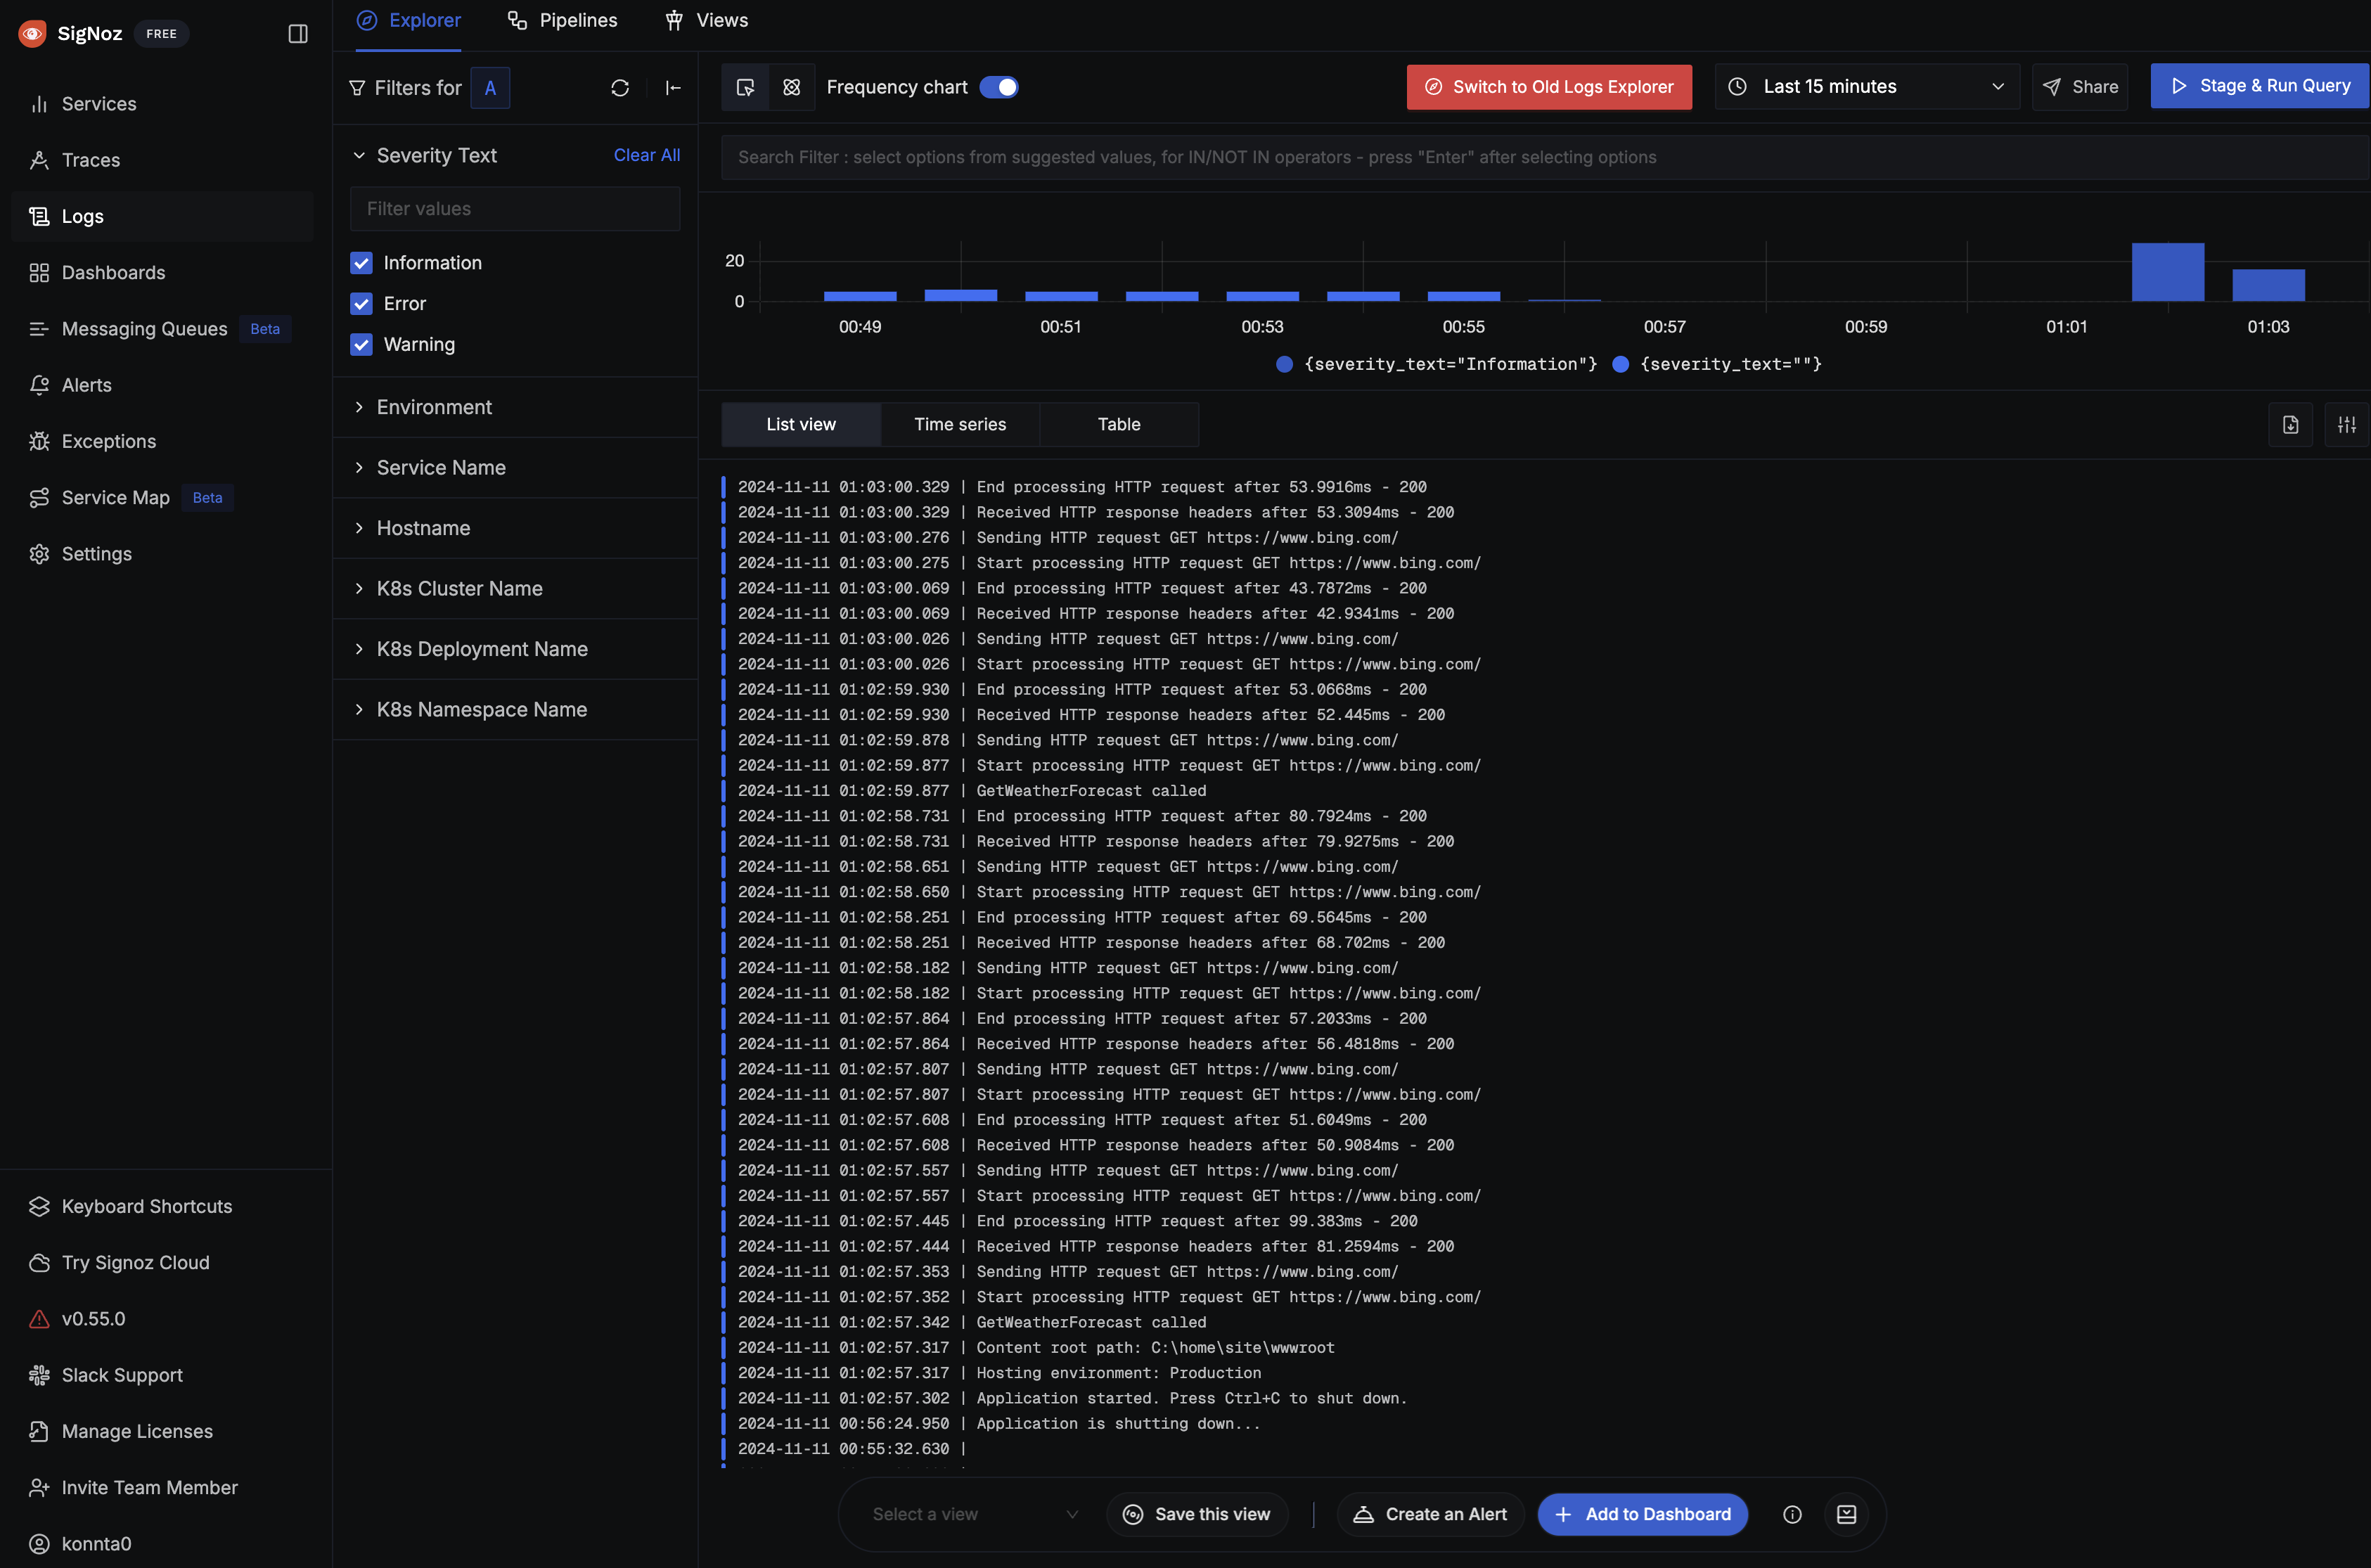
カスタムログ
サンプルアプリでは Error, Warning, Information のログを発行するように実装してあり、それらがログとして記録されていることが確認できます。
また、HTTP Client の自動インスツルメントのログが発行されることも確認できます。
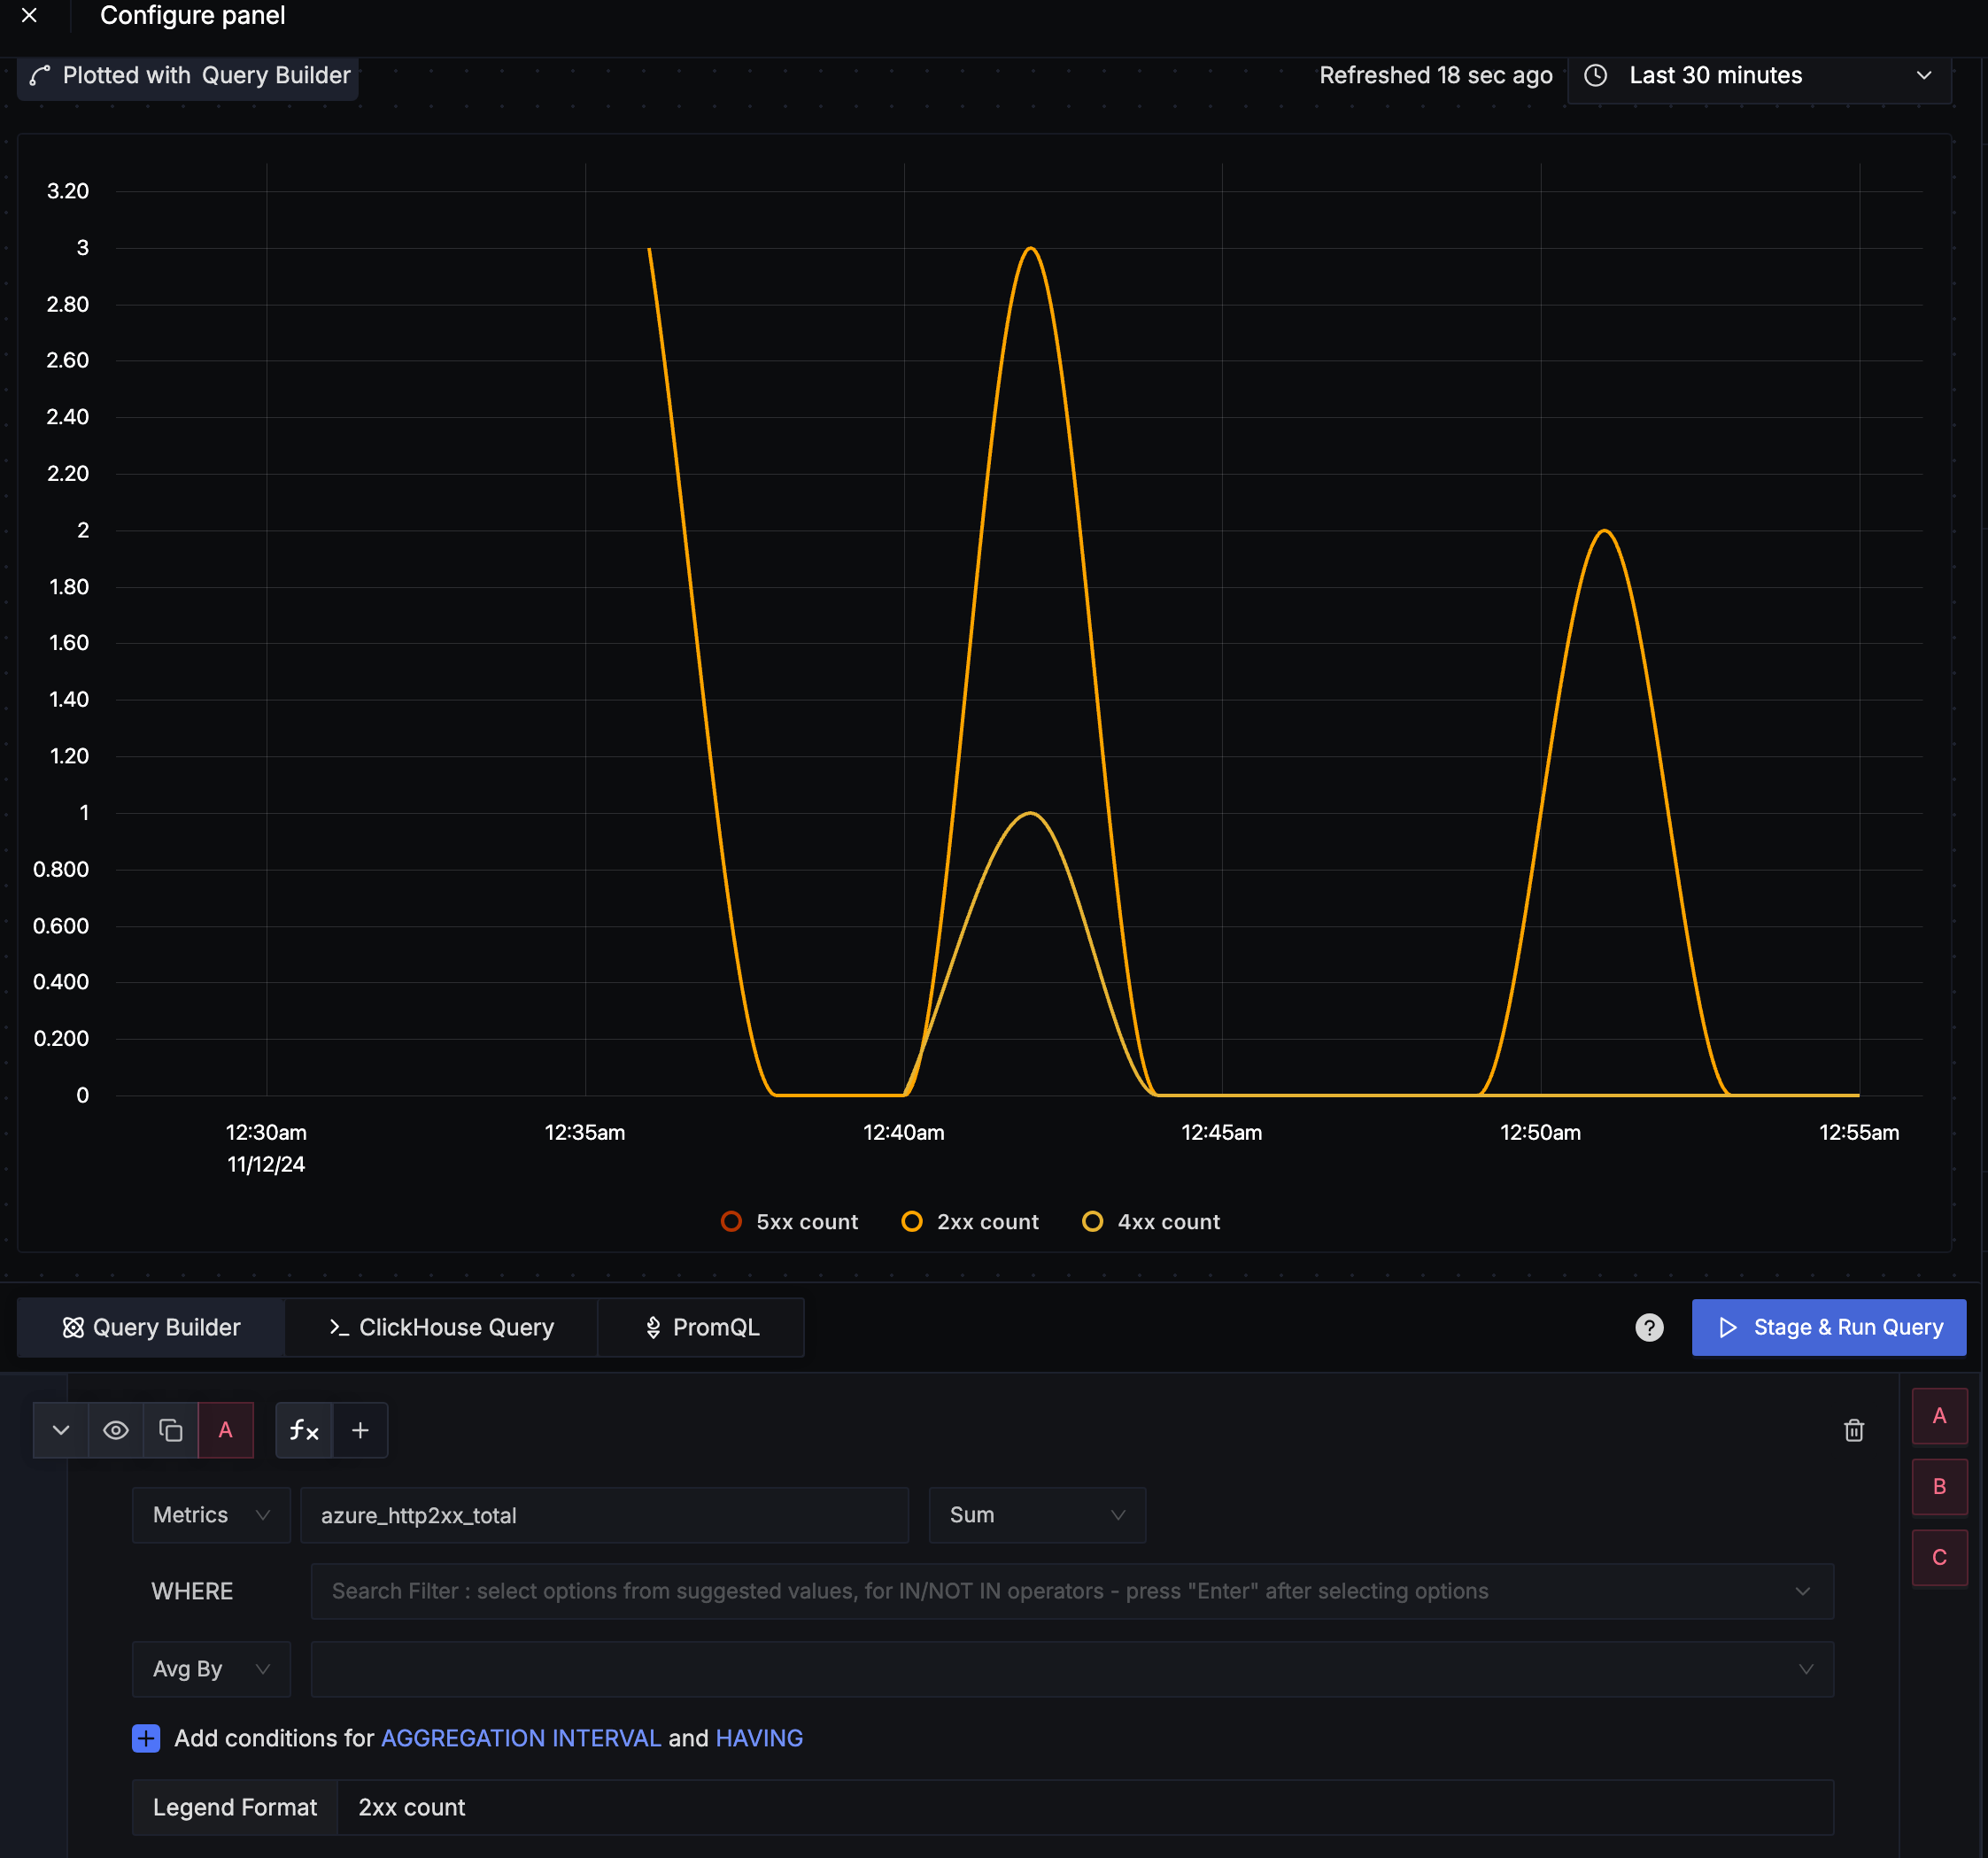
App Service のメトリクスを SigNoz で確認する
システムメトリクス
今回は HTTP Status Code を確認しました。Azure 関連のシステムメトリクスは azure_ サフィックスで記録されています。
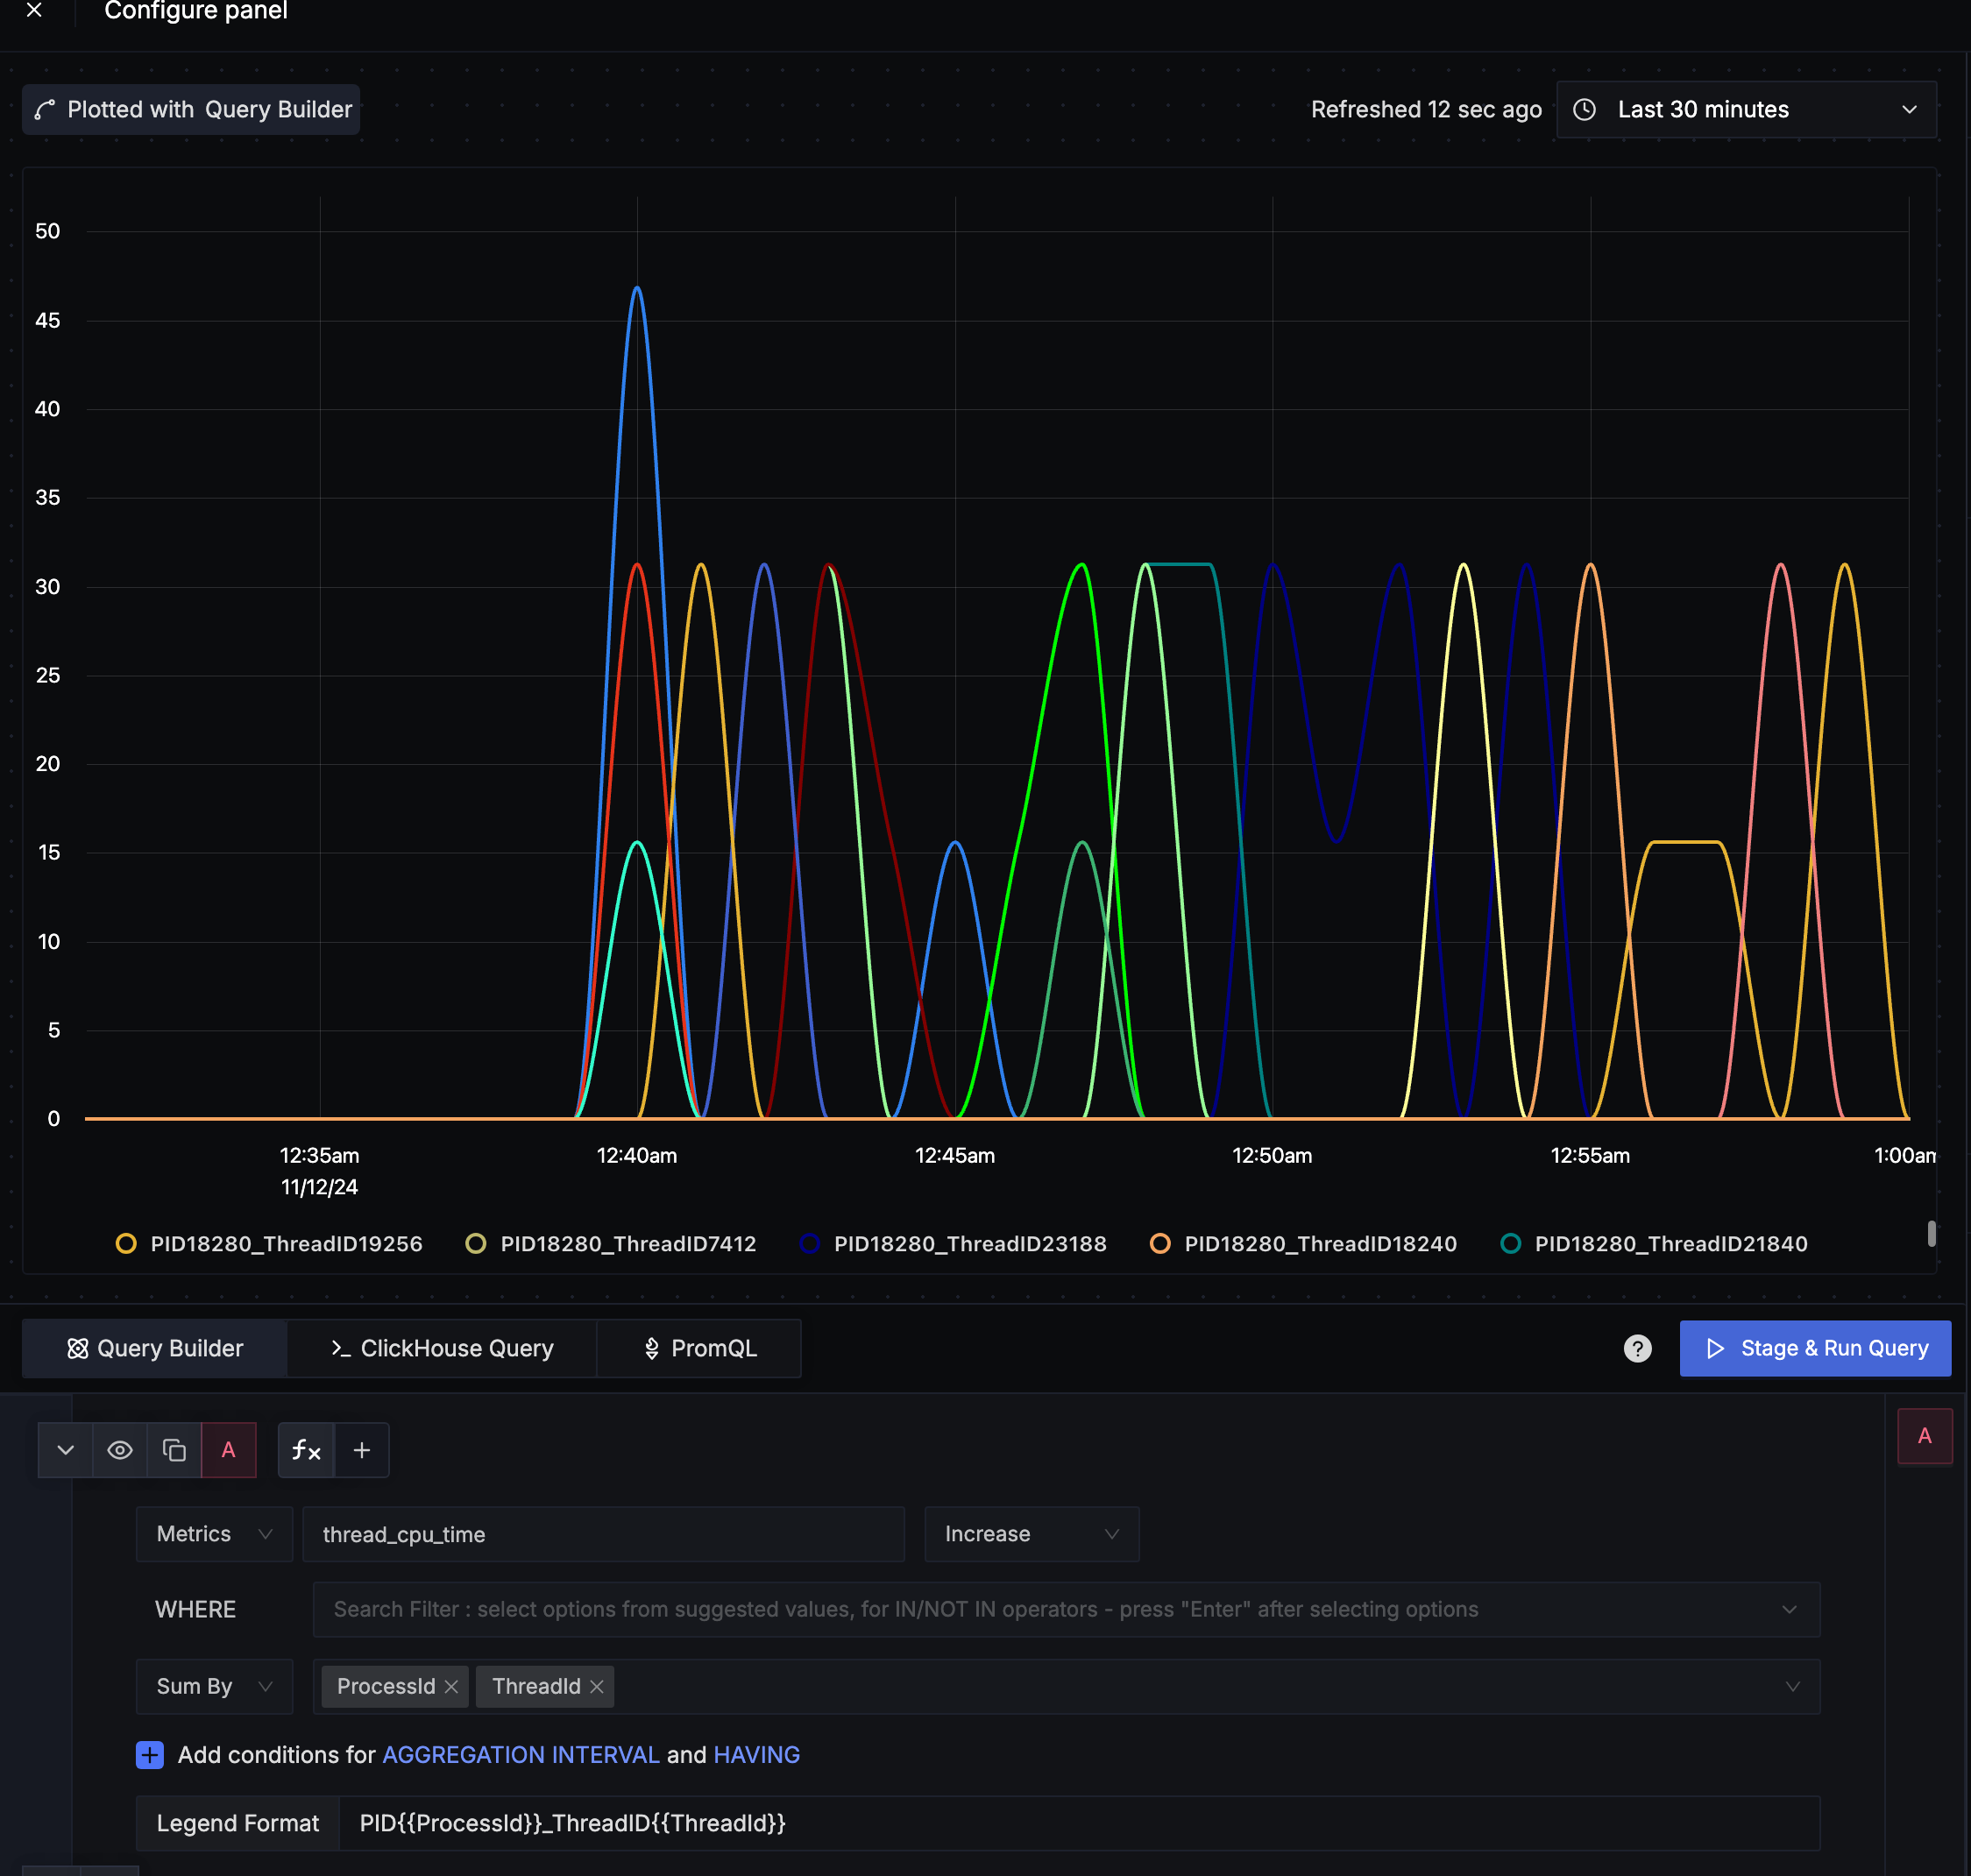
カスタムメトリクス
サンプルアプリでは CPU 時間(ミリ秒) をメトリクスとして実装しており、それらが確認できます。
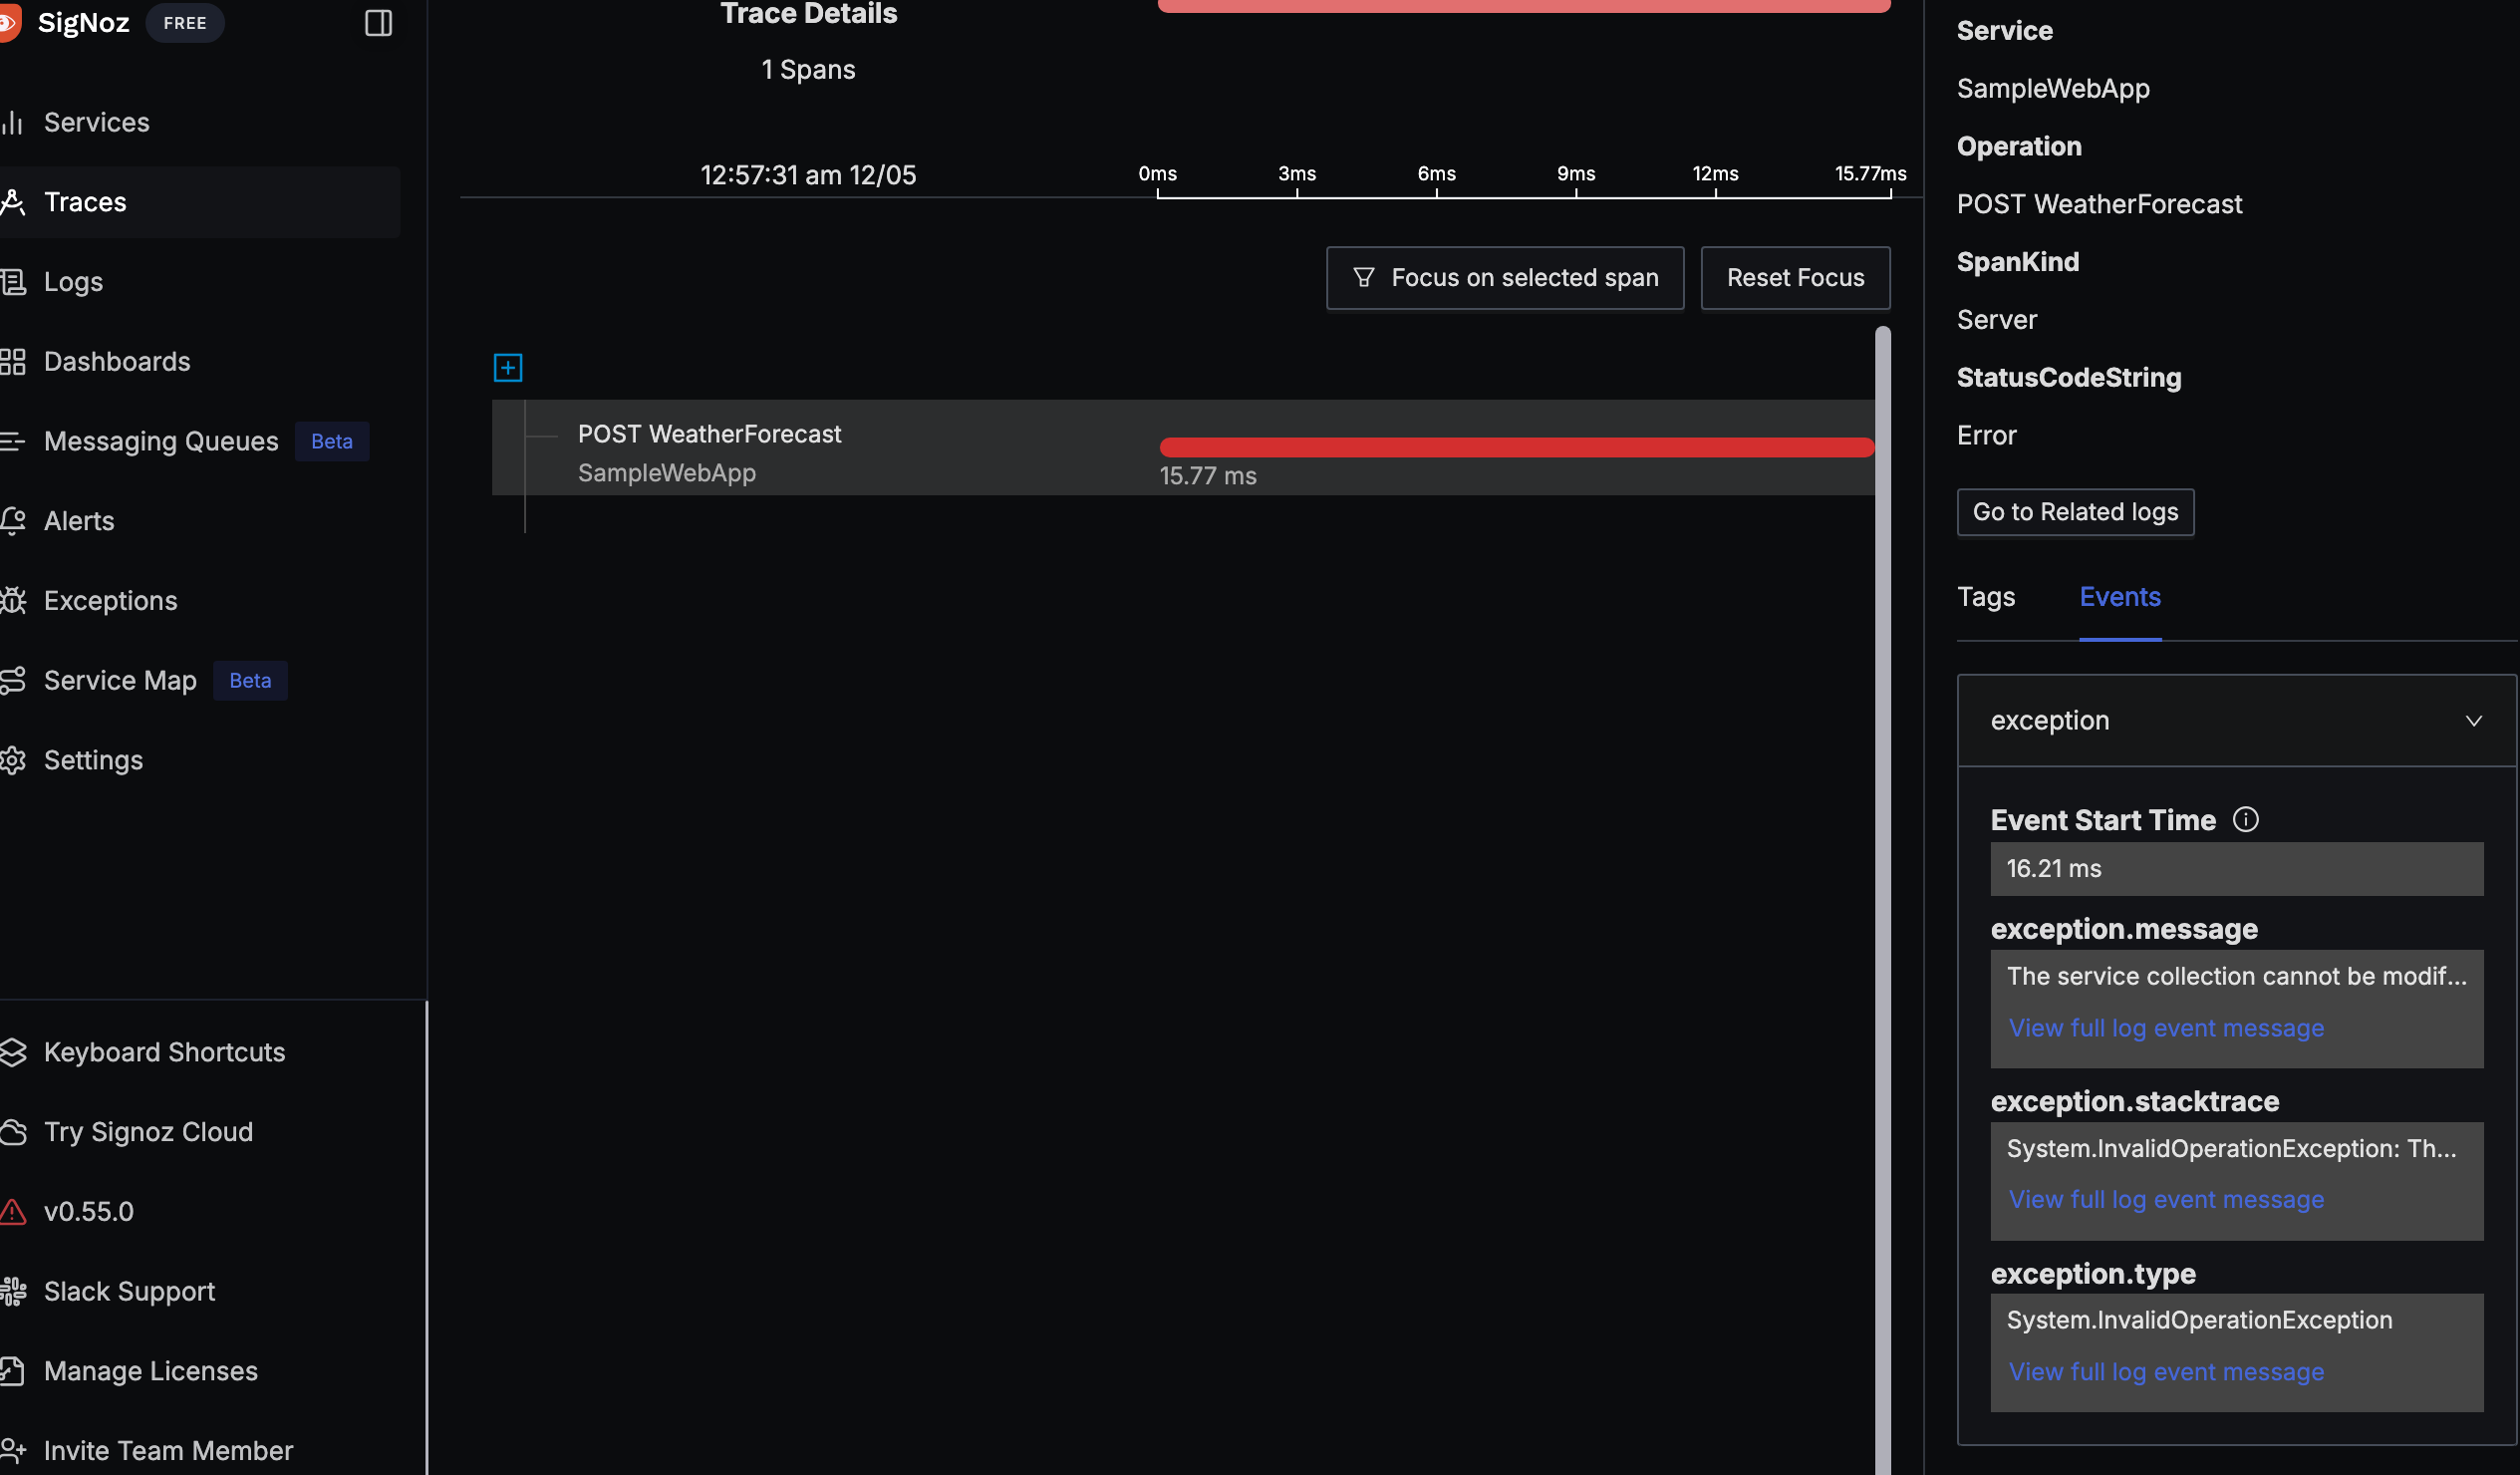
App Service のトレースを SigNoz で確認する
自動トレース、カスタムトレース
今回デプロイしているサンプルアプリでは GET の要求を実行した際にカスタムトレースを発行しつつ HTTP Client のカスタムトレースを発行されるように実装してあります。
要求を実行すると以下のようにトレースが発行されていることがそれぞれ確認できます。
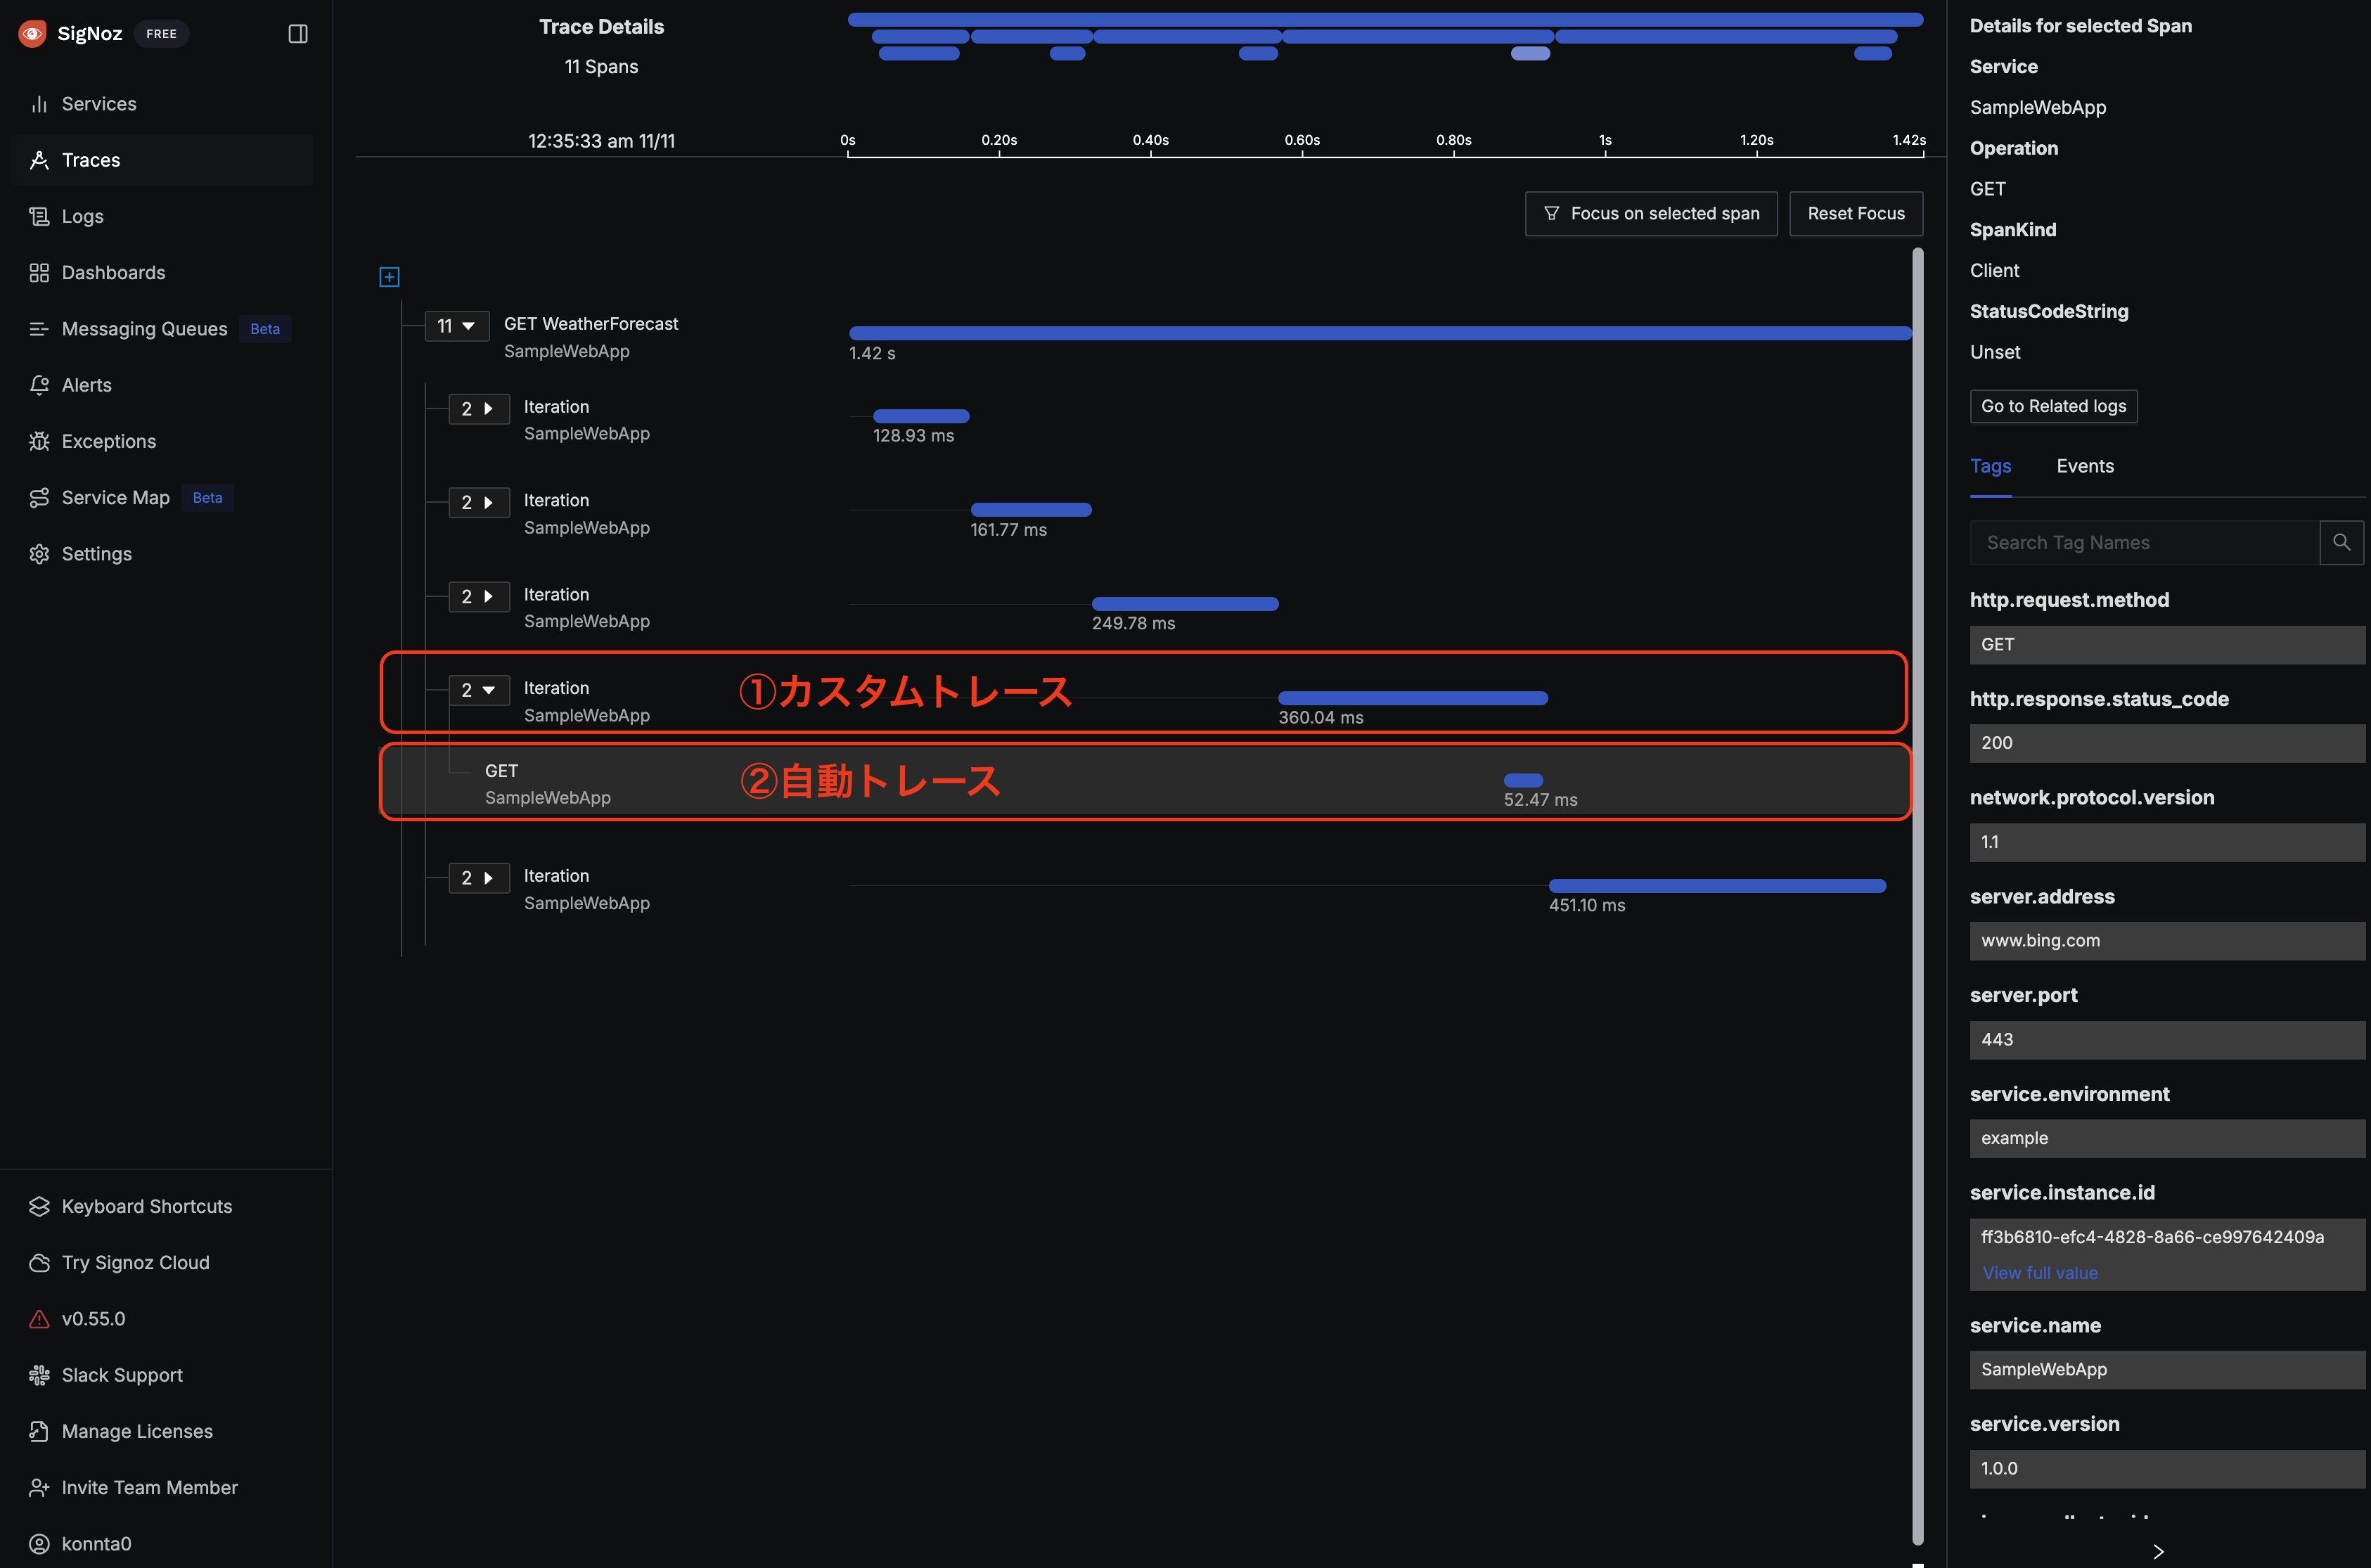
また、今回のサンプルでは RecordException = true の設定をしているため例外をトレースとして確認することができます。